
Vehicles and patrols
A Rust map file has no way to say “a minicopter stands here”, “the Bradley drives this loop” or “the cargo ship goes round this way”. The Vehicles and Patrols tool lets you draw all three, saves them inside your map, and the server extension makes them happen in game.
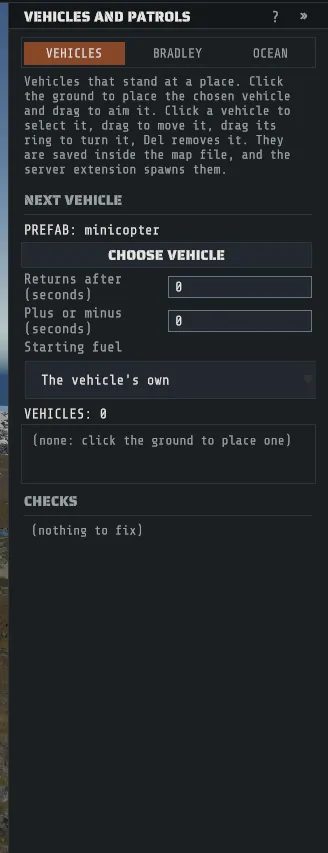
Pick Vehicles and Patrols on the tool rail, or in the TOOLS menu. It has no key until you give it one in Preferences > KEYBINDS. The status bar then reads:
LMB place a vehicle or add a path node · click one to select · drag to move · drag a vehicle's ring to aim · click a line to insert a node · Del removes · Esc steps backThe panel has three segments: VEHICLES, BRADLEY and OCEAN. Each has its own list, and a Checks list at the bottom that names anything the server would trip over. Click a line there to go to the thing it is about.
None of this does anything on a server without the extension. The map still loads and plays: it has no placed vehicles, the launch site’s Bradley drives its usual route, and the cargo ship sails a ring the server works out for itself.
Vehicles
Section titled “Vehicles”A placed vehicle is a spot the server keeps a vehicle on. It is not a prefab in your map, and that is deliberate: a vehicle dropped into a map as an ordinary prefab appears once per wipe with an empty tank and never comes back.
- Click CHOOSE VEHICLE and pick one. The list is read from your Rust content: helicopters, boats, cars, bikes, horses, siege weapons and train cars.
- Set Returns after (seconds).
0means the vehicle spawns once and is not replaced. - Click the ground to place it, and keep the button down to drag the way it should face.
- Click a vehicle to select it. Drag it to move it. Drag the ring around it to turn it.
- Press Del to remove the selected vehicle.
In the viewport a vehicle is a box with an arrow out of its nose, not a model. The box is a rough size for that kind of vehicle.
| Setting | What the server does |
|---|---|
| Returns after (seconds) | Once the vehicle is gone from its spot, a new one is put there after this long. 0 spawns it once. |
| Plus or minus (seconds) | How much that wait may vary, either way. |
| Starting fuel | The vehicle's own is what the game gives that vehicle when it spawns one itself. Empty tank is none. An exact amount is the number of fuel items you type. |
| Heading (degrees) | Which way it points. 0 is north, 90 is east. |
Three things about how they behave on a server:
- A vehicle is only spawned where the spot is clear. If something stands there, or a player is within 2 m, the server waits and tries again. It never spawns one on top of a player.
- Placed vehicles are saved like any other vehicle in the game. After a restart the vehicle that was standing there is still there, and it is not doubled. One that a player flew home is still at that player’s base, and the spot gets a new one.
- A boat belongs on water and a car on land. The Checks list says so when one is on the wrong surface, floats above the ground, or stands within 5 m of another.
Train cars are in the list because the game has them, with a warning: the game removes a train car that spawns more than 15 m from a rail track.
A Bradley path
Section titled “A Bradley path”A Bradley does not drive a lap. It picks a place to go, finds a way there along the path, drives to it, then picks another. The places it picks from are the path’s interest points.
- Open the BRADLEY segment and click the ground. The first click starts a path; each click after adds a node to the end of it.
- Click a node to select it, and drag to move it. Click a line between two nodes to put a node there.
- Select a node and click MARK AS INTEREST POINT for each place the Bradley should drive to. A marked node is drawn larger.
- Leave Closed loop on for a circuit, or turn it off for a path the Bradley drives back and forth along.
- Press Del to remove the selected node. DEL on a row of the list removes the whole path.
Mark at least two interest points, more than 10 m apart, or mark none. With none, the server spreads its own along the path, and the editor shows them as hollow rings so you can see where they are. One on its own is not enough for the game: the Bradley would drive to it and park. The server ignores a single mark and uses its own points, and the Checks list tells you.
The Bradley drives a straight line between two nodes, through whatever stands on that line. Put nodes close enough together that each straight line is clear. The Checks list flags a line longer than 150 m, a line steeper than 20 degrees and a node in water.
| Setting | What the server does |
|---|---|
| Use the launch site’s Bradley, off | The path gets a Bradley of its own. It appears on the path a few seconds after the server finishes starting, and the launch site’s Bradley is left alone. |
| Use the launch site’s Bradley, on | The launch site’s own Bradley drives this path, and the game respawns it as it always does. Only one path on a map can use it, and the map needs a launch site. |
| Bradley returns after (minutes) | How long after it is destroyed the path’s own Bradley comes back. 0 uses the server’s own Bradley respawn setting. |
Each path that brings its own Bradley is a whole extra Bradley on the server. The Checks list speaks up past three.
The ocean path
Section titled “The ocean path”The cargo ship sails a ring around the map. A server normally works that ring out for itself every time it starts. Draw one here and the server uses yours.
- Open the OCEAN segment and click the sea. Each click adds a node; the ring is always drawn closed.
- Drag a node to move it. Click a line to put a node on it. Del removes the selected node.
- Read the arrows: they point the way the ship sails.
A map has one ocean path. It is always a closed ring on the sea surface, and only the cargo ship uses it. The patrol helicopter has no route in the game at all, so there is nothing here to draw for it.
The Checks list flags a node on land or over shallow water, a node close to the shore, two nodes more than 200 m apart (the ship sails that stretch dead straight) or closer than 30 m (the ship skips nodes that close), and a harbor the ring never comes near. The ship leaves the ring to dock at the node nearest each harbor, so keep the ring within reach of every harbor you want it to visit.
Start from a generated ring
Section titled “Start from a generated ring”You do not have to click the whole ring. Under Starting ring, set Distance from shore (m) and press GENERATE RING. Creator works out a ring that far outside the shallow water, all the way round the land, and offers it: the ring is drawn dashed in the viewport and on the map overview, and the panel lists what it is. The distance starts at 200, which is what the game uses for the cargo ship; it takes 50 to 1000.
Nothing is written to your map yet. Read the lines, look at the ring, then:
- ACCEPT RING makes it the map’s ocean path. If the map already has one, its nodes are replaced and its name is kept. One undo takes the whole ring back.
- DISCARD RING drops the offer. Pressing GENERATE RING again replaces it with a new one.
An offer you never accept is never saved, and a map you never drew a ring on still has none.
The ring keeps the same distance from a harbor and from a bridge as it keeps from the shore, because that is what the game’s own ring does: anything standing in the water holds it off, at one distance. The panel says how clear of each one the ring stays, and how far the ship leaves the ring to dock at each harbor.
An oil rig is the exception, in the game and here: it does not hold the ring off. The panel tells you how close the ring passes to each rig, or that it runs through one, so you can move those nodes after you accept.
On a map of several islands the ring goes round the whole group. With Go round the whole island group on, which is how it starts, the ring stays out of the water between the islands: it does not run down a strait or under a bridge. A bay of a single island is still followed. Turn the switch off and the ring follows every shore it can reach, into each strait wide enough to enter, which is what the game’s own ring does. An island counts toward the group from a quarter of a square kilometer up; a smaller islet still holds the ring off, and does not pull the group’s outline out to it.
A harbor on the inside of the group ends up a long way from a ring that goes round the outside. The panel’s line for that harbor says how far, and the Checks list flags it after you accept. Turn the switch off, or move a few nodes in toward it.
Treat the ring as a first draft and edit it. Creator works it out from the terrain, each harbor’s and rig’s footprint and each recorded bridge. It is not the game’s own generator, which tests the real collision shapes, so the ring can stand a little farther off a harbor than the game’s would.
Paths that came with an imported map
Section titled “Paths that came with an imported map”A map made in RustEdit can carry its own Bradley routes and ocean path. Creator shows them here as
ordinary paths, named Imported Bradley path 1 and Imported ocean path, and you edit them like any
other. What a save does with them follows the map’s
server target: on the default target an edited path is written back as
RustEdit’s own data and an untouched one is left byte for byte; on the creator target they are saved
as Creator’s.
Saving, and other tools
Section titled “Saving, and other tools”Everything here is saved inside the .map file, so it travels with the map. A save is refused, with
the reason, for the few things a server could not use at all: a vehicle with no prefab, a vehicle or
Bradley node off the map, a Bradley path with fewer than two nodes, a second ocean path, and a second
path set to the launch site’s Bradley.
Rotate and Resize in Map tools move vehicles and path nodes along with everything else, in the same undo step. The map overview has a layer for each of the three: Bradley for the Bradley paths, Cargo for the ocean path and a ring on offer, and Vehicles for the placed vehicles.
Confirm it on a server
Section titled “Confirm it on a server”Once your map is running on a server with the extension, its start-up log has one line for each of the three:
[Creator.Ext] vehicles: found=4 applied=4 respawns=0 skipped=0[Creator.Ext] bradley paths: found=1 applied=1 ownBradley=1 launchSite=0 respawns=0 skipped=0 noTarget=0[Creator.Ext] ocean ring: found=1 applied=1 nodes=58 extra=0 refused=0 arm=patch patched=2/2found is what the map carries and applied is what the server took. A vehicle whose spot was not
clear when the server started shows under skipped or waiting. A server owner can turn each part
off without touching the map, with RC_EXT_VEHICLES=0 or RC_EXT_PATROLS=0 in the server’s
environment.