
Ramps
The Ramp tool builds a graded strip of ground between two points: a way up a hillside, onto a plateau or down into a pit. You click its foot and its head, the ramp is drawn over the terrain, and nothing is written until you press APPLY RAMP. Applying is one step that one Ctrl+Z takes back.
An applied ramp stays a ramp. It is not baked into the heightmap and forgotten: click one of its ends again, today or after you save and reopen the map, change a number, and the ground is written again from the ground that was there before the ramp.
Pick Ramp on the tool rail or in the TOOLS menu, or press N. The status bar then reads:
LMB places the foot, then the head · LMB on a ramp's end picks it up · Drag an end to move it, the middle to bend it · Enter applies · Esc puts it down · Ctrl+Z takes an apply back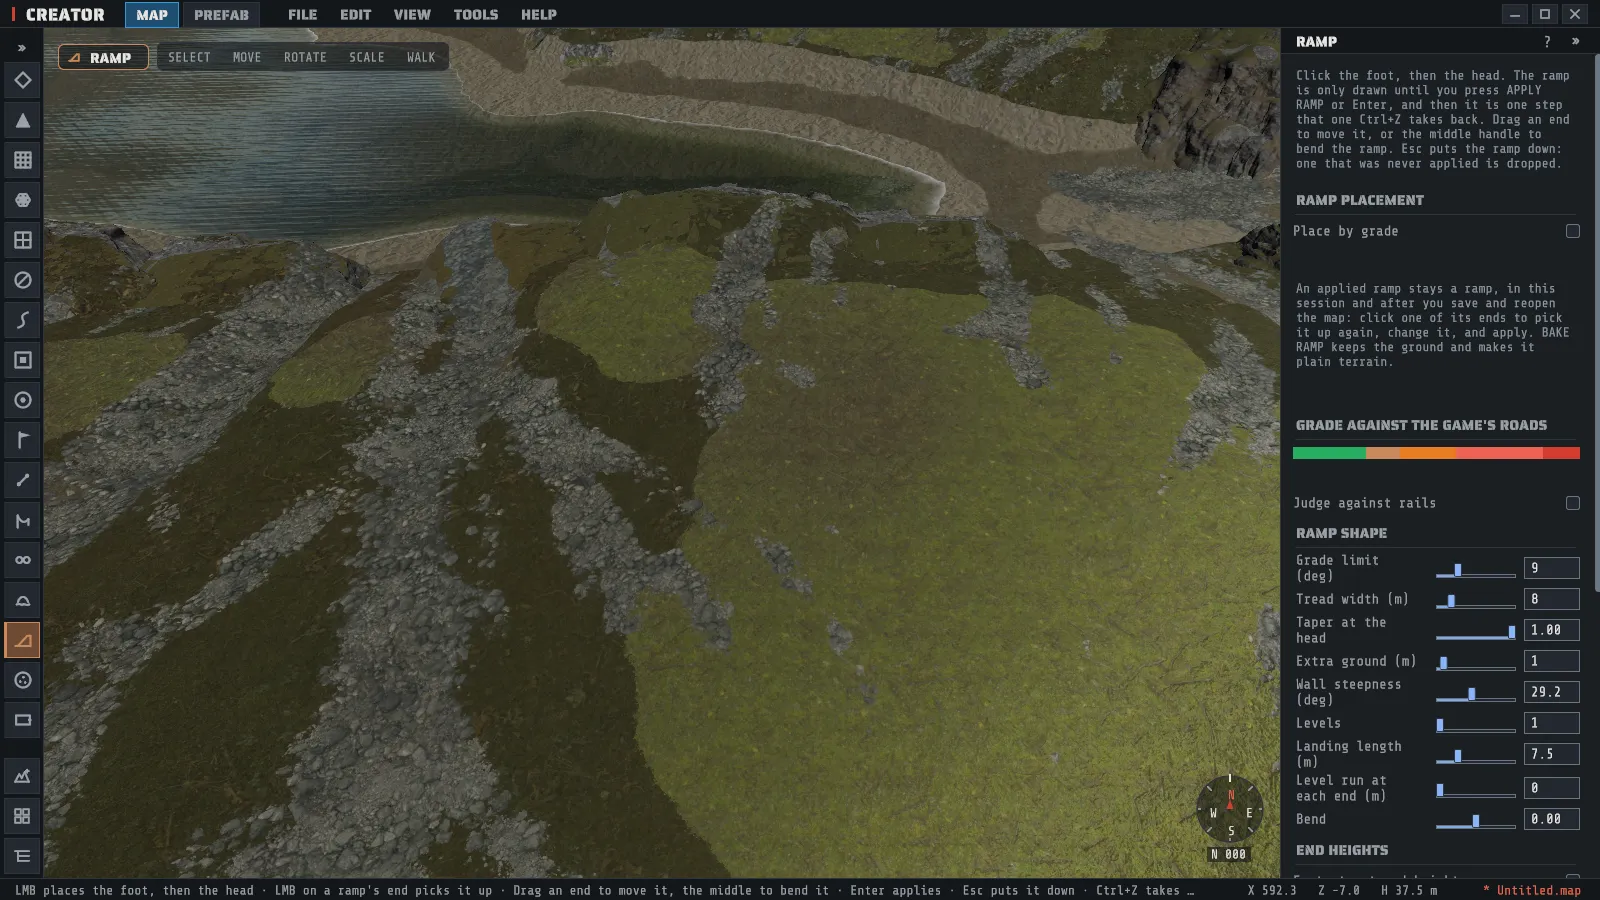
Place a ramp
Section titled “Place a ramp”- Click the ground where the ramp starts. That is its foot.
- Move the pointer. The ramp is drawn from the foot to the pointer: its center line, the edges of its tread, the foot of each bank and a rib across it every few meters.
- Click where it ends. That is its head. The ramp is now in hand and still only drawn.
- Change anything you like: drag an end to move it, drag the square in the middle sideways to bend the ramp, or move a slider in the panel. The drawing follows.
- Press APPLY RAMP, or Enter.
Esc puts the ramp down. A ramp that was never applied is dropped and nothing is changed. The right mouse button is the fly camera here as everywhere, so you can look round the hillside while you place.
Place by grade
Section titled “Place by grade”Turn on Place by grade and the second click means something else: it gives the direction, and the height to reach. The head lands as far along that direction as the Grade limit needs to climb to that height, so the ramp is exactly as steep as the limit at its steepest and no steeper. The longest a ramp can be is 600 meters; if that is reached first, the panel says how far the ramp climbed.
What the panel tells you
Section titled “What the panel tells you”The readout under the buttons gives the ramp’s length and rise, its average grade and its steepest, the volume of ground it cuts and fills, and the deepest cut and tallest fill. When the ramp is steeper than the grade limit it says how many more meters of run it needs, and there are three ways to give it that: move the foot back, add bend, or accept the grade shown.
The grade, against the game’s own roads
Section titled “The grade, against the game’s own roads”The bar marks the ramp’s steepest grade on bands measured from the roads the game itself generates, over three vanilla maps:
| Up to | What it means |
|---|---|
| 9.0 degrees | A typical vanilla road. 95 in 100 stretches are gentler. |
| 13.1 degrees | A steep vanilla road. 99 in 100 stretches are gentler. |
| 20 degrees | Steeper than nearly any vanilla road. |
| 30.5 degrees | The game’s road router refuses ground this steep. 30.5 is the steepest stretch ever measured. |
| beyond | Steeper than any vanilla road measured. The ramp is drawn in red from 20 degrees up. |
Judge against rails shows the same bar for the game’s rails: 8.9, 13.1 and 18.2 degrees.
A new ramp’s grade limit is 9 degrees, the typical vanilla road.
The shape
Section titled “The shape”| Control | What it does |
|---|---|
| Grade limit (deg) | The steepest the ramp may be. It is what the readout judges the ramp against, and what Place by grade builds to. |
| Tread width (m) | The width of the flat a player or a vehicle uses, at the foot. |
| Taper at the head | The tread’s width at the head as a share of its width at the foot. 1 keeps it the same all the way. |
| Extra ground (m) | Flat ground kept beside the tread on each side before the bank begins. |
| Wall steepness (deg) | How steeply the banks stand. The default, 29.2 degrees, is what the banks beside the game’s own roads measure. |
| Levels | How many flights the climb is cut into. Two or more put a level landing between each pair. |
| Landing length (m) | The length of each landing. The default is 7.5 meters. |
| Level run at each end (m) | A level stretch at the foot and at the head before the climb begins. |
| Bend | Curves the ramp to one side along a circular arc. 0 is straight. The readout gives the bend’s radius and says how it compares with the turns in vanilla roads. |
The ramp cuts where the ground is higher than it and fills where the ground is lower, so one ramp can run along a hillside with a cut on its uphill side and a fill on the other. Each flight eases in and out, so the ramp meets the ground and every landing without a kink.
The end heights
Section titled “The end heights”Each end sits on the ground unless you turn on Foot at a typed height or Head at a typed height and type a height in meters above sea level. An end held above or below the ground eases back to it past the end of the ramp.
Finishing
Section titled “Finishing”| Control | What it does |
|---|---|
| Paint the tread | Paints gravel or dirt along the tread, with the same soft edge the game’s roads have. Where a bank is steep enough for the game to draw rock, the bank is painted rock by the game’s own rule. |
| Mark as road ground | Marks the tread as road and the banks as roadside in the topology layer. That is what keeps the game’s rocks, trees and power poles off the ramp when a server spawns them, and off it in a later scatter. |
| Clear rocks and trees | Removes the rocks, trees and clutter the ramp buries, in the same undo step. |
| Keep banks out of water | Never builds a bank out below sea level. |
| Road up the ramp | Lays a road or a trail up the ramp, in the same undo step. See Roads on a ramp. |
Clearing takes only what the game scatters over the ground by itself. It never takes a monument, a locked or hidden prefab, a piece of a custom prefab group, or anything you placed by hand. The line under the buttons says how many were cleared and how many were left, by reason.
Change a ramp later
Section titled “Change a ramp later”Click either end of an applied ramp while nothing is in hand, or pick it in Edit ramp, and it is in hand again with its numbers in the panel. Change it and press APPLY CHANGE: the ramp’s old ground is put back and the new ramp is written, as one undo step. Until you apply, the map is untouched, and PUT RAMP DOWN drops your changes.
- REMOVE RAMP takes the ramp away and gives its ground back.
- BAKE RAMP keeps the ground as it stands and makes the ramp plain terrain. After that it is no longer a ramp and cannot be picked up.
Sculpting on a ramp is kept. If you raise or smooth the ground on its banks by hand and later change the ramp, your edit is carried into the ground under the ramp. On the tread itself the ramp wins: it is flat by definition.
Where ramps are saved
Section titled “Where ramps are saved”Ramps are saved beside the map, in its .rcside file, together with the ground under each of them. The
.map itself holds finished terrain, so a server, and any other tool that opens the map, sees the ramp as
ordinary ground. A map copied without its .rcside still has every ramp’s ground; the ramps can no longer
be picked up.
Find ground nobody can reach
Section titled “Find ground nobody can reach”VIEW > Reach shades, in red, the ground a player cannot walk to from the sea. It follows the terrain as you edit it, a moment after you stop.
A player is taken to start in the sea, to swim any water, and to walk any ground no steeper than the on-foot slope and any ledge no taller than the on-foot step. Cars are followed from every road, over ground no steeper than the by-car slope and through water no deeper than the by-car depth. Turn on Tint ground a car cannot reach to shade, in a second color, the ground a player walks to and a car does not.
| Limit | Starts at | Where it comes from |
|---|---|---|
| On foot: steepest slope (deg) | 45 | The slope every walking AI in the game is built for. An estimate: a player’s own limit is in no file Creator may read, and is being measured. |
| On foot: tallest step (m) | 0.505 | The same AI’s step. An estimate, for the same reason. |
| By car: steepest slope (deg) | 20 | The steepest ground the game’s road router accepts. Every working car climbs it. Up to 48.4 degrees the answer depends on the car: its weight, its engine and its parts. |
| By car: deepest water (m) | 0.62 | The shallowest water in which a car’s engine can stop. |
USE THE GAME’S LIMITS puts all four back.
The view reads the shape of the ground and nothing else. Stairs, ladders, bridges and tunnels are not ground, so a monument that is reached by its own stairs can show as unreachable. A ledge lower than a cell of the view’s grid (about 4 meters on a 4000 map) is too small for it to see.
Add a ramp there
Section titled “Add a ramp there”Press ADD RAMP HERE in the Reach window, then click a shaded area. The Ramp tool opens with a ramp drawn from reachable ground onto it: the one, round the edge of that area, that moves the least ground at the grade limit and crosses no monument or building. It is a draft like any other. Move it, reshape it, and press APPLY RAMP, or put it down.
The Map Validator reports the same ground.
Roads on a ramp
Section titled “Roads on a ramp”Set Road up the ramp to Road or Trail and APPLY RAMP lays one on the ramp’s center line, in the same undo step as the ramp. Its nodes are one road node pitch apart (7.5 meters), and every one of them is held at the ramp’s surface: the game’s road law, which otherwise smooths a road’s heights along its length, keeps a held node where it is, so the road climbs exactly as the ramp does. It is a live road in the Paths tool like any other.
It is the ramp’s road. Changing the ramp takes it up and lays it again on the ramp as it now is, removing the ramp takes it up too, and baking the ramp leaves it as a plain path where it lies. A node of it you drag in the Paths tool is yours from then on and no longer held.
A ramp steeper than the game’s road router accepts (20 degrees at its steepest) gets no road: APPLY RAMP says so, and you can lower the grade, lengthen the ramp or choose No road.
A road you draw over a ramp yourself is not held: the road law smooths its heights, and on a short, steep ramp that regrades the climb.
Sculpt’s Bridge mode
Section titled “Sculpt’s Bridge mode”Sculpt has a Bridge mode that also joins two clicks with graded ground. It writes straight into the heightmap and is finished when you release. Use the Ramp tool when you want to see the ramp first, judge its grade, or change it afterward.