
Sculpting
Sculpting changes the terrain’s height. Press C, pick a mode, drag on the ground: the stroke applies
as you drag and lands on the undo stack as one step when you let go. A single click is a stroke too: it
lays one dab and is one undo step, and Ctrl+Z pressed while a stroke is still in progress undoes that
stroke, never the step before it. Sixteen modes share one brush, so
the size, shape, falloff and filters you set carry across all of them.
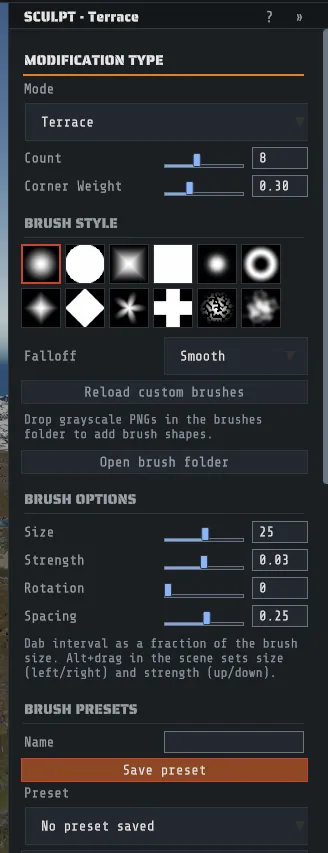
The brush, once, for every mode
Section titled “The brush, once, for every mode”| Control | What it does |
|---|---|
| Size | The brush radius in meters, 1 to 500. The slider is logarithmic: an equal move of the handle multiplies the size by the same amount, and the default 25 m sits in the middle. [ and ] step it by a percentage, so the step stays useful at any size |
| Strength | How hard one dab pulls, 0 to 1. The slider gives most of its length to the small values sculpting uses: the default 0.03 sits in the middle, each quarter of the bar is about six times stronger than the one before it, and 1 is still at the right end. , and . step it along the same scale |
| Brush Style | The footprint: twelve built-in shapes (soft and hard circles, squares and diamonds, plus Gaussian, Ring, Star, Cross, Speckle and Cloud), and any grayscale PNG you drop in the brushes folder |
| Falloff | Smooth, Linear, Sharp or Plateau: how fast the brush weakens from its center to its rim |
| Rotation | Turns the footprint, 0 to 359 degrees, which matters for squares, diamonds and custom shapes |
| Spacing | How far apart dabs are laid along your stroke, as a fraction of the size, 0.05 to 1 on a logarithmic slider with the default 0.25 near the middle |
The box beside each slider always shows the exact value, and a value you type there is used exactly as typed; the handle moves to wherever that value sits on the scale.
Alt and drag inside the view sets size and strength at once, left and right for size, up and down
for strength, moving along the same scales the sliders use, without going to the panel. M cycles the mode, and Esc during a stroke cancels it:
the terrain goes back to how it was and no undo step is recorded.
Strokes are laid at a fixed distance along your pointer’s path rather than once per frame, so the same gesture paints the same result whatever your frame rate, and a fast drag leaves no gaps. The cursor ring on the ground traces the real footprint of the shape you picked, and the inner ring sits where the brush is at half strength, which is the honest picture of the falloff you chose.
Brush Presets saves everything above under a name, in a file beside your other settings, so a brush you tuned survives closing the app. Save, load and delete are the three buttons in that section.
The sixteen modes
Section titled “The sixteen modes”| Mode | What it does to height | Its own controls |
|---|---|---|
| Raise | Pushes the ground up | |
| Lower | Pulls it down | |
| Flatten | Pulls the ground toward one height. Ctrl and right-click in the view picks that height off the terrain | Target (m) |
| Smooth | Averages each point with its neighbors | |
| Sharpen | Amplifies local detail, both ridges and valleys | Detail |
| RidgeErode | Sharpens ridge crests only and leaves valleys alone | Sharpness |
| SlopeFlatten | Pulls the footprint toward its own best-fit plane, so it flattens while keeping the average slope | Detail |
| Smudge | Smears the height in the direction you drag | |
| Pinch | Pulls the surface toward the brush center. Hold Shift to bulge it outward instead | Amount |
| Twist | Rotates the height pattern around the brush center | Amount |
| Terrace | Quantizes the footprint into flat steps | Count, Corner Weight |
| ErodeHeight | Takes material off anything standing above its neighborhood, for a weathered look | Detail |
| Bridge | Click a start point then an end point: the corridor between them is graded from one height to the other | Spacing, which quantizes the ramp into discrete supports |
| Clone | Shift and click sets a source, then drag to stamp that terrain elsewhere | Clone Heights, Clone Splat, Aligned movement, Offset (m) |
| HydraulicErosion | Runs a droplet simulation inside the footprint and blends the result in, feathered by the brush | Inertia, Capacity, Erode, Deposit, Multiplier, and two auto-paint toggles |
| Stamper | Presses a height pattern from your stamp library onto the ground. Ctrl inverts it | Stamp grid, Stamp Mode, Scale, Height (m) |
Two of those deserve a note. HydraulicErosion can paint as it works: Paint bedrock as Rock puts the Rock ground texture where it stripped material and Paint sediment as Gravel puts Gravel where it dropped material, and the height and the paint are one undo step. And Stamper’s footprint is its own Scale, not the brush size, so its cursor ring is drawn at that scale instead.
Stamps
Section titled “Stamps”A stamp is a reusable height pattern: a crater, a ridge line, a whole hillside.
- Pick Stamper as the mode.
- Click a stamp in the grid, or use Import stamp (.raw / .png)… to add one.
- Set Stamp Mode: Additive and Subtract raise or lower by the pattern, Set blends the surface toward the pattern.
- Set Scale for the footprint in meters and Height (m) for how much relief it presses in.
- Click on the terrain. One press is one undo step.
Open stamps folder shows you where they live and Reload stamps picks up anything you have
added there by hand. Grayscale PNGs and .raw heightmaps both work.
Brush Filters, which also gate sculpting
Section titled “Brush Filters, which also gate sculpting”The Brush Filters section holds a Height Gate (m) and a Slope Gate (deg), each with its own Min and Max, and a stroke only touches a cell where every gate you have enabled passes. The two conditions on the painting inspector, by topology bit and by ground texture, gate sculpt strokes as well, so “only steepen the ground that is already forest” is two checkboxes rather than careful mouse work.
Whole-map height, and heightmaps
Section titled “Whole-map height, and heightmaps”Advanced Options, at the bottom of the Sculpt inspector, holds the operations that are not a brush. Like every collapsible section it starts closed: click its heading to open it.
| Control | What it does |
|---|---|
| Auto-Adjust Prefab Height | While on, prefabs standing on ground your stroke moves are carried with it, keeping their height above the surface |
| Height (m) with Add Height and Subtract Height | Raises or lowers the whole map by that amount, as one undo step |
Run Erosion (K) | Runs the droplet erosion over the whole map at its default settings, as one undo step |
| Save Raw Heightmap… | Writes the current height grid out as a .raw, to a file you name in a save dialog |
| Import Raw Heightmap | Reads a .raw in, resampling it to your map’s resolution if the sizes differ |
| Bit Depth and Byte Order | 8 or 16 bit, and PC (little-endian) or Mac (big-endian). Both apply to the export and the import |
What sculpting does not move
Section titled “What sculpting does not move”Height is one layer of a Rust map among several. Sculpting a hill does not repaint the ground textures under it, does not change the biome, and does not move the topology bits that tell the game where the beach and the forest are. Those are painting, and a hill you raise out of a beach usually needs both.