
Roads, rails, rivers and powerlines
A Rust map stores its roads, rails, rivers and powerlines as splines: a named chain of nodes with a width. The Paths tool is where you draw them, move their nodes, and apply the terrain work that makes a drawn line look like a real road: flattening the ground under it, painting its surface, and stamping the topology bits the game reads.
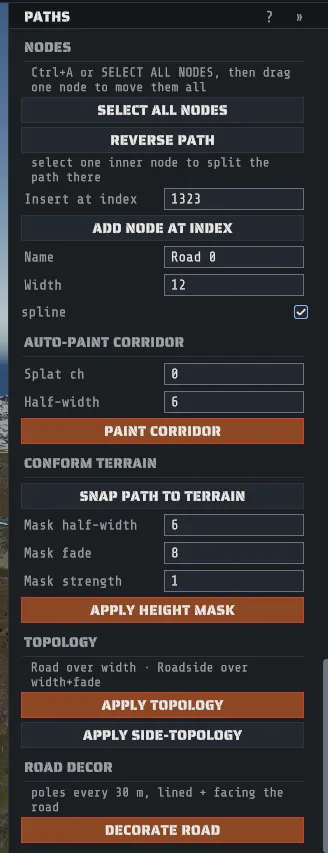
Press P or pick Paths on the tool rail. The status bar then reads:
LMB pick node · click terrain adds a node · Del removes · Esc clearsPath types
Section titled “Path types”+ PATH asks what kind of path to make. Each type is one of the kinds the game’s own generator builds, and a new path starts with every value the generator writes for that kind: width, padding and fade, the random width variation, the mesh and terrain offsets, the ground texture, the topology bit, the start and end flags and the hierarchy. Hover a type for a one-line description.
| Type | Named | Width | What the path becomes |
|---|---|---|---|
| Ring Road | Road N | 12 m | A main road like the generated ring road: gravel, hierarchy 0. Creator draws the road surface, and APPLY TOPOLOGY stamps Road and Roadside. |
| Road | Road N | 10 m | A side road like the roads the generator runs to monuments: gravel, hierarchy 1, with a road surface. |
| Trail | Road N | 4 m | A dirt trail, hierarchy 2. The game names trails Road too; the hierarchy is what makes it a trail, and like the game Creator draws no road surface for it. |
| Rail Ring | Rail N | 4 m | A main rail line like the generated rail loop, hierarchy 0. Creator draws the track, and the topology bits are Rail and Railside. |
| Rail Spur | Rail N | 4 m | A rail spur like the ones the generator runs to monuments, hierarchy 1. |
| Rail Siding | Rail N | 4 m | A siding beside a rail line, hierarchy 2. |
| River | River N | 8 m | A river. It widens downstream as the game’s rivers do, Creator draws a water ribbon whose width follows the width field, and the topology bits are River and Riverside. |
| Powerline | Powerline N | none | A powerline. It has no width and no ground work, and no road or rail surface is drawn for it; it is the group the game strings overhead wires along. |
The new path takes the next free number after the paths of the same name already on the map. Every row in the path list, and the inspector’s TYPE line, names the path’s type.
The name still matters. A Rust map has no type field: the game sorts its paths by the way the
name starts (Road, Rail, River, Powerline), and the hierarchy tells a ring road from a side
road from a trail. So if you rename a path, keep its first word, or it stops being that kind of path.
A path whose name says nothing (an older Path 1, say) takes its type from its topology bit if it
has one, and otherwise shows as Custom: it is treated as a road for topology, with no surface
drawn.
Draw one
Section titled “Draw one”- Click + PATH and pick a type. You get an empty path of that type, named for it and selected. Creating it is one undo step.
- Click the terrain to add a node. Each click appends one to the end of the path.
- Drag a node to move it. Nodes move horizontally, keeping their height; set a height in the Nodes section (see Editing nodes).
- Hold Ctrl and right-click near the line to insert a node into the nearest segment instead of appending to the end.
- Select a node and press Del to remove it. Esc clears the selection.
- Set width in meters. On a river this drives the water ribbon and updates as you type.
- Click SNAP PATH TO TERRAIN so every node sits on the ground. SNAP NODE n TO TERRAIN does only the selected one.
Every one of those is a single undo step, including a whole drag.
Make the terrain agree with the path
Section titled “Make the terrain agree with the path”A drawn spline is only a line until you apply it to the ground. The inspector’s lower half does that, and all four actions share the corridor fields above them: mask half-width is how far either side of the line the effect reaches, mask fade is the graded band beyond that, and mask strength is how completely the terrain is pulled to the path.
| Action | What it writes |
|---|---|
| APPLY HEIGHT MASK | Pulls the terrain height to the path’s own height across the half-width, graded out over the fade. This is what makes a road sit in the landscape instead of on it. |
| PAINT CORRIDOR | Paints one ground texture channel along the line, using the splat ch (0 to 7) and half-width fields in the Auto-paint Corridor section. See Painting for what the channels are. |
| APPLY TOPOLOGY | Stamps the path’s main topology bit over the half-width. The inspector names the two bits it will use before you press it. |
| APPLY SIDE-TOPOLOGY | Stamps the side bit over the wider half-width plus fade band, which is the region the game treats as “beside a road”. |
Joining and copying
Section titled “Joining and copying”Two path actions, both one undo step:
- JOIN TO NEAREST PATH connects the selected path to the geometrically nearest other path, through whichever of its ends is closest. Holding Ctrl and clicking does the same thing in the viewport.
- DUPLICATE PATH clones the whole node shape as a new path, offset sideways, and selects the copy. It is the fastest way to get a second carriageway or a parallel rail.
Editing nodes
Section titled “Editing nodes”The Nodes section of the inspector works on the selected path’s nodes. Every action in it is a single undo step.
- SELECT ALL NODES, or Ctrl+A with the Paths tool active, selects every node of the path. Drag any one of them to move the whole path, press Del to remove them, or type a height. A plain click on one node goes back to selecting just that node.
- REVERSE PATH runs the path the other way, so its last node becomes its first. The map file’s markers for the path’s two ends swap with it.
- SPLIT AT NODE n appears when one inner node is selected. It cuts the path in two at that node:
the path keeps everything up to the node, and a new path takes the rest, named after the original
with
spliton the end. Both halves keep the split node, so the line does not move, and the new name starts the same way, so the new path keeps its type. - ADD NODE AT INDEX inserts a node at the number in Insert at index, where 0 is before the first node. It defaults to just after the selected node, or to the end of the path. A node between two others lands on the curve halfway between them; one at either end continues the end segment.
- Node X, Node Y and Node Z place one selected node exactly, in meters. With several nodes selected, Node Y sets all of their heights at once.
- Raise nodes by moves every selected node up by that many meters, or down with a negative number.
Road decor
Section titled “Road decor”DECORATE ROAD lines the selected road with telephone poles every 30 m, one tower every eight poles, each yawed to face along the road and offset just clear of the carriageway. It reports what it placed under the button. It refuses a river, and it needs the game content loaded, because the poles are real Rust prefabs.
The overhead wires Creator draws follow the game’s own rule: a run of poles placed under one path, at least three in a row, sharing the same wire fitting. Poles you place yourself, including these, are not part of a path’s placement group, so no wires are strung between them. Powerline runs on a generated map do get their wires, because the generator places their poles as part of the path.
Where paths are saved
Section titled “Where paths are saved”Paths are a native part of the .map file, not a Creator addition, so they need no sidecar and no
server extension: any server and any other editor reads them. They are written back into the map
every time you save. See The map file and the sidecar.