
Markers and spawn points
Two small tools that annotate a map rather than build it: map markers, which label a place on the
in-game map, and spawn points, which say where the NPCs of a spawn group stand and which way they
face. Both are rail tools with no default shortcut, and both ride inside your .map as Creator data.
A third way to label the map, a monument’s own map name, lives in the transform inspector and is
described below.
Map markers
Section titled “Map markers”Pick Map Markers on the tool rail. The status bar then reads:
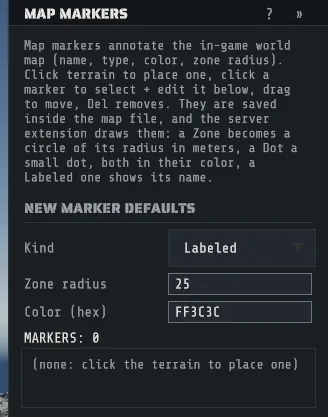
LMB place a map marker · click one to select · drag to move · Del removes- Set the defaults for the next marker under New marker defaults: Kind, Zone radius, and
Color (hex)as six hex digits. These are tool settings and are not undo steps. - Click the terrain to place one.
- Click a marker to select it, then edit Label, Kind, Radius and
Color (hex)under Selected marker. Each field is one undo step and commits when you leave it. - Drag a marker to move it. Press Del to remove it. A right-click or Esc while you are still dragging cancels the drag: the marker goes back, and a marker that same click placed is removed.
There are three kinds:
| Kind | What it is |
|---|---|
Dot | A plain point. |
Labeled | A point with its name shown, the way a monument reads on the map. |
Zone | A ring of Radius meters, for an area rather than a point. |
A marker is two dimensional: it has an X and a Z and no height, because the in-game map is flat. New markers start opaque red until you change the color.
Turn on the Markers layer in the map overview to see them all at once, and to check they read cleanly before you export the image.
Markers ride in your map’s own Creator data, so they need no sidecar. Putting them on the in-game map
needs the server extension: see Run your map on a server.
With it installed, each marker is drawn on the in-game map at load, for players already online and for
everyone who joins later: a Zone becomes a circle of its Radius in meters, a Dot becomes a small
dot of the same size on any map, both in their own color, and a Labeled marker shows its name, drawn with
the game’s own named-marker icon (the same one a shop uses). A Zone smaller than a dot is drawn as a dot. Without the extension nothing is drawn, and the markers are
still recorded in your map and still useful to you in the editor and on the exported overview image.
As always, the map decides and the editor predicts, so confirm on a server: boot the map with the extension installed and open the in-game map.
Monument map names
Section titled “Monument map names”You can give any monument your own name on the in-game map. Unlike the markers above, a monument’s map name needs no server extension: every player sees it on a plain server.
- Select the monument (see Select and transform).
- Type the name in Map Name at the top of the transform inspector and press Enter. It is one undo step.
- Clear the field to remove the name.
The line under the field tells you which of two things the game will do, and it is a fact about the monument rather than a choice:
| The line reads | What players see |
|---|---|
| Replaces the game’s label | The game shows no name for this monument, so yours is its name on the map. This is caves, water wells, swamps, substations, ice lakes, mountains, jungle ruins, train tunnel entrances and the unique environments. |
| Under the game’s name | The game always shows its own name for this monument, and nothing in a map can hide it on a player’s map. Your name is added at the same spot, drawn over the game’s name. A form that stacks your name on a line of its own under the game’s is waiting on a live test and is not used yet. |
The name belongs to the monument: move it and the name goes with it, delete it and the name goes too, and a duplicate starts with no name.
When you save, Creator writes each name into the map as the game’s own map label (the same label prefab community maps use), placed exactly on the monument’s center and listed after it, and records in the map’s Creator data which monument it names. When you open the map again, that label folds back into the monument’s name, so it never shows up as a separate prefab you could drag away from the monument.
A map saved by another editor has no Creator data, so Creator looks at its labels instead. A label placed exactly on a monument’s center, and the only label there, becomes that monument’s map name when you open the map, and the next save writes it back as described above: the same text, on the monument’s center, listed after the monument. Every other label stays an ordinary prefab and is never touched: a label anywhere else on the map, a label on a spot two monuments share, one of two labels on the same monument, an empty label, and a label whose text Creator would have to change to write it back (a line break or a double space, for example).
With the server extension, the server itself uses your names
too: its monument list (the world.monuments console command), the Rust+ app’s map and plugins that read a
monument’s name all see yours. The extension also takes each label out of the server’s monument list, so it
is not treated as an extra monument.
Without the extension, the label is still on every player’s map, but the server counts it as one more
monument at that spot: the patrol helicopter can pick it as a destination, which sends it to that
monument more often than usual; players do not spawn within 50 meters of it; a crashed satellite is pushed
away from it; it is listed by world.monuments; the Rust+ app may show an extra entry named after the
label prefab; and plugins that list monuments see it. Even with the extension, a plugin that walks the
game’s table of spawned prefabs still finds the label there, listed under its own text.
The Map Overview shows what the game will show: your name alone for a monument the game leaves unnamed, and the game’s name followed by yours for the others. As with every marker, confirm on a server: boot the map and open the in-game map.
Spawn points
Section titled “Spawn points”Pick Spawn Points on the tool rail. The status bar then reads:
LMB place a spawn point · drag to face · click a point to re-face · Del removesA spawn point is not a standalone thing. It belongs to one of the NPC spawn groups you set up in Loot, vending and NPC profiles: the group says which NPCs spawn and how many, and the points say where they stand.
So make the spawn group first. A point you place takes the name of the first group on the map, or
no group at all if there are none, and a point that names no group, or a group that is not there, is
reported by the server and never applied. The panel shows each point’s group and marks both of those
cases in red: (unassigned) for a point placed before any group existed, and (missing: name) for one
whose group was renamed or deleted afterwards. A count of them is called out above the list, so a point
that will never spawn anything is visible before you save rather than in a server log.
- Create the spawn group in TOOLS > Profiles (Loot, Vending, NPC)…, on the NPC SPAWNERS tab.
- Pick Spawn Points on the rail.
- Click the terrain and hold: the point is placed where you clicked and looks along your drag. Release to commit it.
- Click an existing point and drag to turn it to a new facing. A right-click or Esc while you are still dragging cancels it: the point keeps its old facing, and a point that same click placed is removed.
- Press Del to remove the selected point, or use the DEL chip on its row.
The panel lists every point as its number, its group, its position and its facing in degrees, and reports POINTS as a running count. Each place, re-face and delete is one undo step.
The NPC profiles panel can also add a point at the camera, under Spawn points on the NPC SPAWNERS tab, which is the quicker route when you are already in that panel and want a point exactly where you are looking.