
Layer files
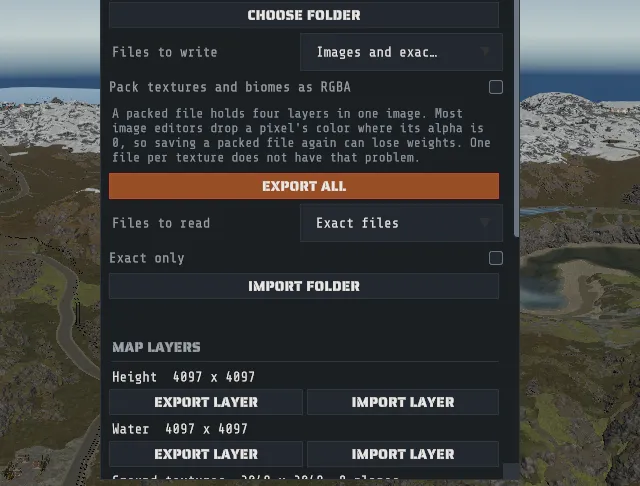
Layer Files writes each terrain layer of the open map to its own file, and reads one back: height, water, every ground texture, every biome, every topology layer and the holes. You get the layers as images you can open in an image editor or a terrain program, and as exact files that are the map’s own bytes.
Open it from TOOLS > Layer Files…. It is a window you can drag by its title bar and resize from its bottom-right corner; its ? opens this page.
Export every layer
Section titled “Export every layer”- Open or generate a map.
- Open TOOLS > Layer Files….
- Check Layer folder. It starts as a folder beside your map, named for it:
mymap.mapexports tomymap-layers. CHOOSE FOLDER picks another. - Leave Files to write on Images and exact files, or choose one of the two.
- Press EXPORT ALL.
The line under the button counts the files as they are written, and then says how many were written and how large they are. The layers are read the moment you press the button, exactly as a save would write them, so you can keep working while the files are written.
EXPORT LAYER on a layer’s row writes that one layer.
What is written
Section titled “What is written”| In the folder | What it holds |
|---|---|
images\ | One PNG per layer, per ground texture, per biome and per topology layer. |
exact\ | One file per layer: the layer’s bytes exactly as the .map stores them. |
layers.json | The manifest: the Creator version, the map’s size, and each file’s layer, resolution, format, checksum and row order. |
The manifest is written last, so a folder that has one holds a complete set. EXPORT LAYER updates a manifest that is already there and does not start one.
The images
Section titled “The images”Every image has north at the top, as the in-game map does.
| Layer | Files | What a pixel is |
|---|---|---|
| Height | height.png, 16-bit gray | The stored height, spread over the full 16-bit range. Black is 500 m below sea level, white is 500 m above it, and sea level is the middle gray. |
| Water | water.png, 16-bit gray | The same scale as height. |
| Ground textures | splat_dirt.png, splat_snow.png, splat_sand.png, splat_rock.png, splat_grass.png, splat_forest.png, splat_stones.png, splat_gravel.png, 8-bit gray | That texture’s weight, 0 to 255. |
| Biome | biome_arid.png, biome_temperate.png, biome_tundra.png, biome_arctic.png, and biome_jungle.png on a map that has a jungle layer, 8-bit gray | That biome’s weight, 0 to 255. A map with a Tropical area also writes biome_tropical.png. |
| Topology | One file per topology that is set somewhere on the map, such as topology_road.png, 8-bit gray | White where the topology is set, black where it is not. A topology that is set nowhere has no file. |
| Holes | holes.png, 8-bit gray | White is ground and black is a hole, with the soft values of a hole’s edge kept. |
Every image holds its layer exactly: read back, each one gives the same bytes the map stores. The height image is the one that needs a rule to do it. The map stores a height as a whole number from 0 to 32766, and the image spreads those over 0 to 65535, so each stored height has its own pixel value.
Pack textures and biomes as RGBA writes the eight ground textures as two RGBA images (splat0.png and
splat1.png) and the biomes as biome0.png (and biome1.png for a jungle layer), four layers to a file, for
a program that wants them that way.
The exact files
Section titled “The exact files”| File | Layer | Layout |
|---|---|---|
height.r16, water.r16 | Height, water | One 16-bit number per cell, low byte first, 0 to 32766. |
splat.bin | Ground textures | Eight layers of one byte per cell, one after another: Dirt, Snow, Sand, Rock, Grass, Forest, Stones, Gravel. |
biome.bin | Biome | Four or five layers of one byte per cell: Arid, Temperate, Tundra, Arctic, Jungle. |
topology.i32 | Topology | One 32-bit number per cell, low byte first, one bit per topology. |
alpha.bin | Holes | One byte per cell: 255 is ground, 0 is a hole. |
tropical.bin | Tropical area | One byte per cell, on a map that has one. |
The exact files have no header, and their first row is the map’s south edge, as in the .map itself. The
manifest records each one’s resolution.
The .raw heightmap that the Sculpt tool saves and imports is a different file:
it is the terrain’s own height grid for other terrain programs, and it stays as it is.
Bring a layer back in
Section titled “Bring a layer back in”- Set Layer folder to the folder that holds the files.
- Choose Files to read: Exact files or Images.
- Press IMPORT FOLDER.
- Read the list, then press IMPORT LAYERS.
The list says what each file will do and how much memory the undo step keeps. Nothing changes until you press
IMPORT LAYERS, and the whole import is one undo step: Ctrl+Z puts every layer back. On a map with
live paths, the import bakes them first, in that same
undo step, and the confirm says how many.
IMPORT LAYER on a layer’s row reads one file into that layer. A file this window wrote is known by its name.
For an image with another name, open Files with other names and choose which texture, biome or topology it
is. A file that is not a .png is read as that layer’s exact file.
| Layer | What an import replaces |
|---|---|
| Height, water | The whole layer. After a height import the terrain and the next save hold the file’s heights exactly. |
| Ground textures | The exact file replaces all eight textures. One texture’s image replaces that texture and leaves the other seven as they are. The weights are kept as the file has them, including a cell whose textures do not add up to a full weight. |
| Biome | The exact file replaces every biome. One biome’s image replaces that biome. |
| Topology | The exact file replaces the layer. One topology’s image sets and clears that topology only. |
| Holes | The whole layer, with the soft values at a hole’s edge. |
Four things an import decides for you, and says in the list:
- A file of another size is resampled to fit: smoothly for height, water, textures and biomes, and to the nearest cell for topology and holes. Tick Exact only to refuse such a file.
- A biome file set from a map with a different number of biome layers is refused. A map has four biome layers, or five when it has a jungle layer, and the two do not fit each other.
- A topology with no image is cleared, when the folder has its manifest, because the manifest lists every topology that was set when the folder was written. Without a manifest, each image changes its own topology and nothing else.
- On a map with a Tropical area, where an imported Arid weight is lower than a cell’s Tropical share, the share is lowered to it, and the list counts the cells.
Paths and prefabs as files
Section titled “Paths and prefabs as files”The window’s last section writes the two things a map holds that are not layers.
EXPORT PATHS AND PREFABS writes three files to the folder’s objects\ subfolder:
| File | What it holds |
|---|---|
paths.json | Every road, river, rail and powerline: its name, its width and fades, the ground texture and topology it paints, and every node. |
prefabs.json | Every placed prefab: its prefab path, its id, its category, and its position, rotation and scale. |
prefabs.csv | The same prefabs, one a line, for a spreadsheet. |
The files hold what the saved map would. Every number is written so that it reads back to exactly the same value.
IMPORT PATHS and IMPORT PREFABS add a file’s contents to the open map. They never replace what is there, and each import is one undo step.
- An imported path whose name the map already has takes a new name, such as
Road 3 (merged). - A prefab is placed by its prefab path. If the path is not a prefab of your Rust version, its id is tried; a row that names no prefab Creator can place is left out, and the window says how many were.
- One import places at most 5000 prefabs. The window says how many rows were past that; split the file to add them.
These two are separate from EXPORT ALL and IMPORT FOLDER on purpose: an import of prefabs adds, so importing a folder twice would place every prefab twice.
A round trip changes nothing
Section titled “A round trip changes nothing”Press EXPORT ALL and then IMPORT FOLDER on the same folder: the window tells you the files hold exactly what the map already has, and it changes nothing. That holds for the exact files and for the images.
Export, then sculpt and paint, then import the folder and save: the saved map’s terrain layers are the ones you exported, byte for byte.