
Select and transform
Selecting is where every prefab edit starts: pick something, and the inspector on the right becomes that prefab’s transform while the gizmo appears on it in the view. This page covers picking things, the four ways to move them, and the flags (locked, hidden, grouped) that decide what a click can touch.
Select
Section titled “Select”Press S for the Select tool, then:
| Input | What it selects |
|---|---|
| Click a prefab | That prefab, replacing the selection |
Ctrl and click | Adds or removes that one, for a multi-selection |
| Click one piece of a grouped custom prefab | The whole group (a pack placed by an imported map, or a broken monument). Hold Alt to pick just that piece |
| Click the same spot again | The next prefab behind the one you got, so you can reach something inside a monument |
Shift and click | A menu of every prefab under the cursor, nearest first, with its distance. Choose one to select it on its own (a group member is taken alone, as Alt takes it) |
| Drag from empty ground | A box. Plain replaces the selection, Ctrl adds to it, Alt removes from it |
Click empty ground, or Esc | Nothing, which clears the selection |
Two details are worth knowing. The box test uses each prefab’s own origin point, not its whole outline, so a very large prefab is caught by where it sits rather than by how far it reaches. And picking is done against the real meshes, so what you click is what you get even on prefabs that have no collision of their own.
A click that appears to do nothing is usually telling you something. If the prefab under your cursor is locked or hidden, Creator says so in a toast rather than silently ignoring you.
Move, rotate and scale
Section titled “Move, rotate and scale”The gizmo on the selection is the same in every one of these tools, and you pick the mode with 1
(move), 2 (rotate) and 3 (scale), from the tool strip beside the tool name at the top left of the
view (SELECT, MOVE, ROTATE, SCALE), from the rail’s Select button, or from the Tool
dropdown at the top of the inspector.
| Tool | The gesture | The exact numbers |
|---|---|---|
| Move | Drag an axis arm to move along it, or drag the prefab itself to slide it across the ground | The Position X, Y and Z fields |
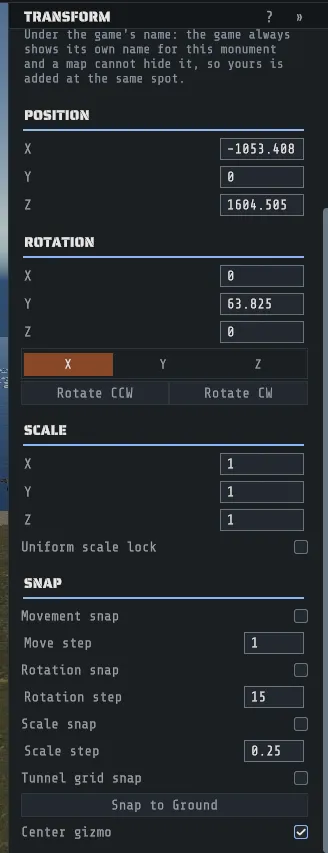
| Rotate | Drag one of the three axis rings to turn about that axis, or the larger outer ring to turn about your line of sight | The Rotation fields, plus Rotate CCW and Rotate CW on the axis you pick with the X / Y / Z segment, in 15 degree steps or in your rotation snap step when that is on |
| Scale | Drag the cube on an axis to scale that axis alone, or the center cube to scale all three at once | The Scale fields, with Uniform scale lock to tie them together |
The handles are colored by axis: X red, Y green, Z blue. The one under the pointer lights up, so you can see what a press will take before you press. Grabbing a handle always wins over picking the prefab behind it, and a press on a panel never reaches a handle.
A few details make the handles behave the way other 3D editors do:
- Only the near half of an axis ring is a handle. The far half is drawn faint: it sits behind the selection and crosses the other rings, so it is left alone. Turn the camera if you need the other side.
- A ring seen almost edge-on still works. Drag along the ring’s line and it turns.
- With one prefab selected, the scale cubes sit on that prefab’s own axes, so dragging the X cube stretches the prefab along its own length even when it is turned. With several selected, the cubes use the world axes, unless the space is local (below).
- Holding
Shiftsnaps. A ring snaps to your rotation step (15 degrees unless you changed it), a scale cube to your scale step (0.25), and a move arm to the 1 meter grid. When a snap is turned on in the inspector’s Snap section, the drag snaps withoutShift. Escor the right mouse button cancels a drag in flight. Everything goes back where it was and nothing is added to the undo history.- A scale drag cannot mirror a prefab. It never flips an axis to a negative number, and a prefab that is already mirrored stays mirrored. See negative scale.
Local or world space
Section titled “Local or world space”Press X, click WORLD or LOCAL in the tool strip, or pick Space in the inspector, to choose
which axes the gizmo uses. World (the inspector calls it Global) is the map’s own axes, and is
where every map starts. Local puts the move arms, the rotate rings and the scale cubes on the
selected prefab’s own axes, so you can slide a turned building along its own length or spin it about
its own tilted up axis. With several prefabs selected, local space uses the axes of the one you clicked
first. The choice is remembered between sessions, and it cannot change in the middle of a drag.
Snap to other prefabs, and to the tunnel grid
Section titled “Snap to other prefabs, and to the tunnel grid”Hold Alt while you drag and the prefab’s origin snaps to the nearest other prefab’s origin within
reach, or failing that, to the nearest face of another prefab’s bounding box. A small cross marks what it
snapped to. On a move arm the snap only lines the prefab up along that arm. Alt also has a meaning at
the moment you press, and the two never collide: Alt held as you press on a piece of a group selects
that one piece, and Alt held while you drag snaps. To drag a whole group with the snap, click the
group first, then press on it and hold Alt once the drag has started.
The tool strip shows WORLD, LOCAL and TUNNEL only in the tools that move prefabs. X and
Ctrl+Shift+T work in every tool: pressed in a brush or another tool, they still change the saved setting,
and the message that confirms it says the setting applies when you next move a prefab. The tunnel lattice
belongs to the map, so in the prefab workspace TUNNEL is hidden and the snap does not apply; your
setting is kept for when you return to the map.
The tunnel-grid snap is a toggle: Ctrl+Shift+T, the TUNNEL segment of the tool strip, or Tunnel
grid snap in the inspector’s Snap section. While it is on, every move puts the prefab’s origin on
the lattice the game lays its train tunnels on (3 meters across, 1.5 meters up, the same rounding the
game applies to a tunnel entrance), so a hand-placed tunnel piece or entrance lines up with the
generated network. Every cell center of that lattice sits on those steps, so a piece can always reach
one exactly.
G drops the whole selection onto the ground. Ctrl with the arrow keys nudges it by a fixed step
(the Nudge m slider in Preferences), and a burst of nudges lands as one
undo step rather than twenty.
Ctrl+Shift+C copies the selected prefab’s position, rotation and scale, and Ctrl+Shift+V pastes
all three onto everything selected.
Snapping
Section titled “Snapping”The Snap section of the inspector holds three independent snaps and their steps: movement
(1 meter by default), rotation (15 degrees) and scale (0.25). Rotation and scale apply to values you type
and to what you drag with the rings and cubes (holding Shift while you drag does the same for one
gesture), movement applies to values you type, and they are remembered between sessions. Snap to Ground in the same section is
the button form of G.
Locked, hidden and grouped
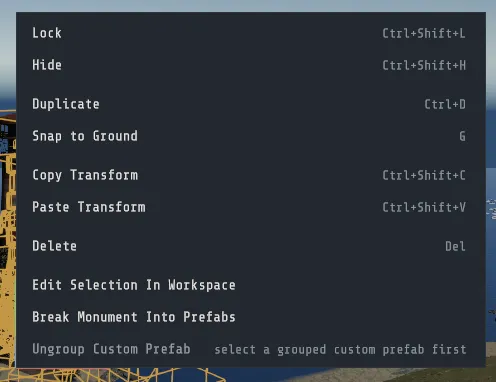
Section titled “Locked, hidden and grouped”These three are how you work inside a busy map without fighting it. All of them are on the EDIT
menu, on the right-click context menu over a prefab, and on the ... menu at the top of the
inspector.
| State | What it does | Getting back |
|---|---|---|
Locked (Ctrl+Shift+L) | The prefab can still be selected and inspected, but it refuses to move, scale or be deleted, and the gizmo draws grayed out | Unlock All, Ctrl+Alt+L |
Hidden (Ctrl+Shift+H) | The prefab stops drawing and stops being selectable, and it leaves the selection | Unhide All, Ctrl+Alt+H |
Groups (Ctrl+Shift+1 to 9) | Tags the selection as group 1 to 9. Ctrl and the digit recalls it later | Assign the group again, or assign an empty selection over it |
Locked and hidden are session states and are undoable like any edit. Neither is written into your map, so nothing you lock or hide changes what a server sees.
The transform inspector, top to bottom
Section titled “The transform inspector, top to bottom”| Section | What is in it |
|---|---|
| Header | The prefab’s readable name, its full asset path underneath (hover for the whole thing), and the ... menu. A multi-selection says how many are selected and that it is editing the first. |
| Tool and Space | The four transform modes, and the gizmo’s space: Global (the map’s axes) or Local (the selected prefab’s own axes). |
| Map Name | Monuments only: your own name for the monument on the in-game map, and one line saying whether it replaces the game’s label or sits under the game’s name. See monument map names. |
| Position, Rotation, Scale | The numbers, editable. Each committed edit is one undo step. |
| Snap | The three snaps, their steps, Tunnel grid snap, Snap to Ground and Center gizmo. |
| Prefab Modifiers | Monuments only: one button per terrain mask the monument actually carries, named Apply Height Mask, Apply Splat Mask, Apply Biome Mask, Apply Topology Mask or Apply Alpha Mask, plus Refresh Spawn Instances. |
Prefab Modifiers is how you re-apply a monument’s own authored terrain work after you have sculpted near it: the monument’s baked mask is stamped onto the terrain again, as one undo step, and the panel says so when the re-stamp changed nothing. A monument with no authored mask for a channel does not offer that button at all.
Negative scale, and why Creator argues with it
Section titled “Negative scale, and why Creator argues with it”A negative scale axis mirrors a prefab. Both the .map and the custom-prefab format store scale as
three plain signed numbers and neither refuses one, so a mirrored prefab saves and reloads perfectly.
The problem is not the file, it is the game: a negative axis breaks colliders and physics once the
map is on a server, which is why Creator gives you tools to find and fix it rather than a silent
pass.
- Open Scene Hierarchy (
H) and pick the NEG filter. It lists every prefab with a negative axis and counts them. - Click Make all scales positive to flip every one of them positive, map-wide, as a single undo step.
- To stop them appearing at all, turn on the positive-only scale guard in Preferences; typed negative values are then clamped as you enter them.
Everything is one undo step
Section titled “Everything is one undo step”One thing you did is one step on the undo stack, including a drag that moved twenty prefabs and a
whole-map operation. Ctrl+Z reverts it and Ctrl+Y puts it back, and the EDIT menu names what
each one will do, so you can see what is about to be reverted before you commit to it.