
Fill by rule
TOOLS > Fill by Rule… paints one layer across the whole map, or inside a box you draw, wherever the ground passes a rule you set: a height range, a slope range, a curvature range, and masks over what is already painted. An orange preview shows where the fill will land before anything is written, and the whole fill is one undo step.
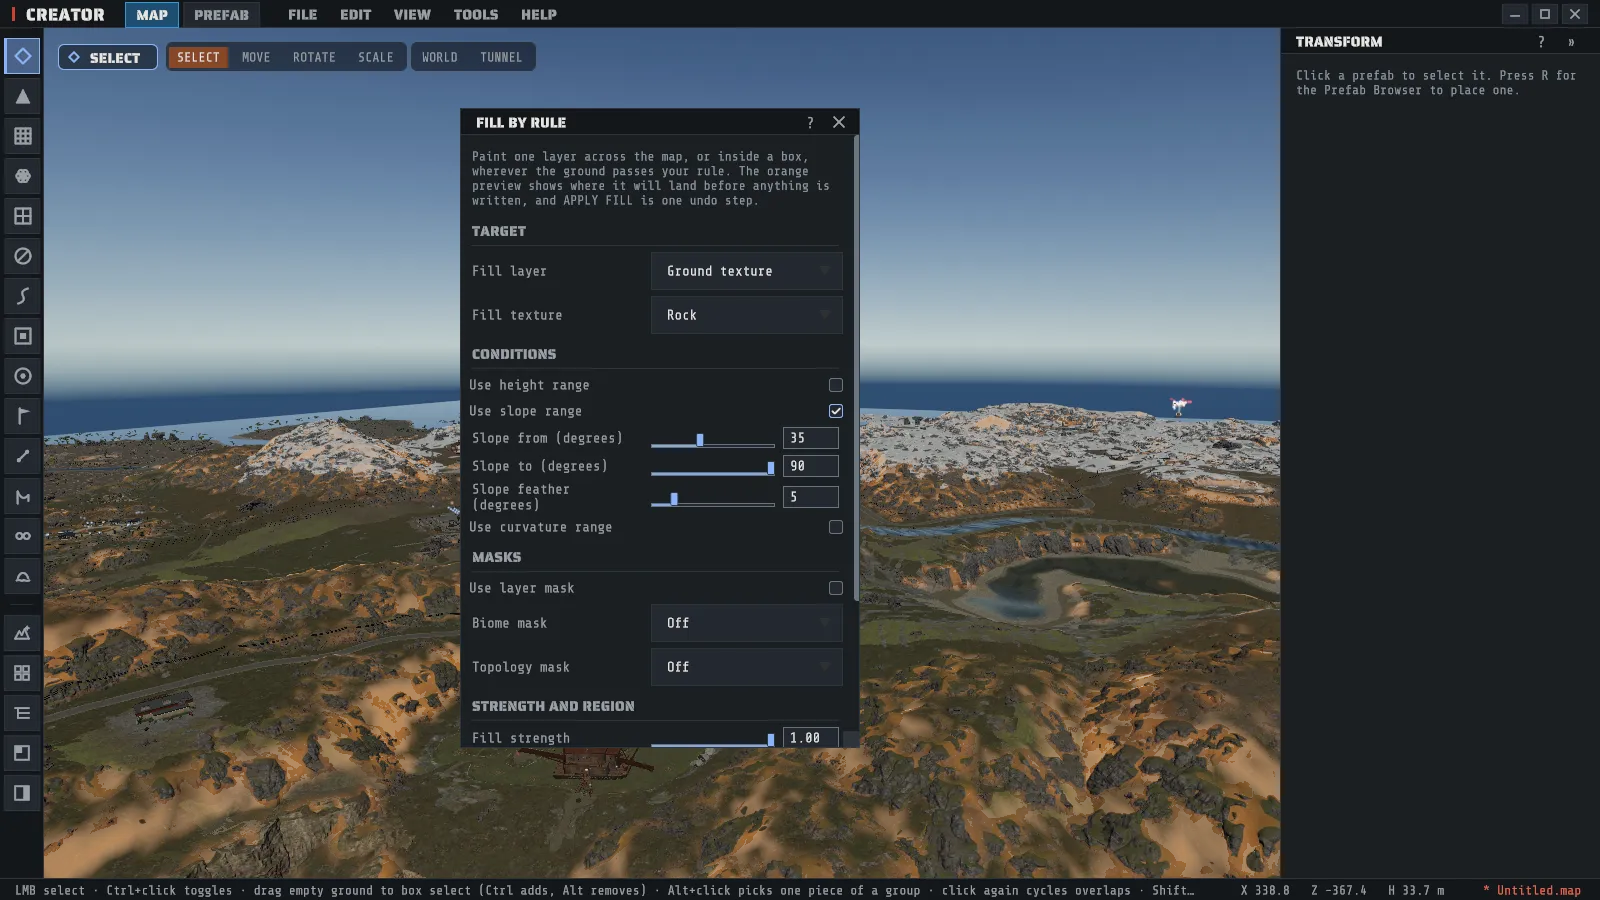
Fill a layer by rule
Section titled “Fill a layer by rule”- Open TOOLS > Fill by Rule…. The window opens with a starting rule: Rock on ground steeper than 35 degrees.
- Under Target, pick the Fill layer (Ground texture, Biome, Topology or Alpha (holes)), then the texture, biome or topology it writes.
- Under Conditions, turn on the ranges you want and set their ends.
- Under Masks, limit the fill by what is already on the map, if you need to.
- Under Strength and region, set Fill strength, and pick Region: Whole map or Box.
- Watch the orange preview and the line under Preview the fill, which says what share of the map the fill would write and about how many square kilometers that is.
- Press APPLY FILL. It reads Filling… for a moment while a large fill runs.
Ctrl+Z takes the whole fill back in one step, whatever its size. RESET RULE puts every setting back
to the starting rule.
The conditions
Section titled “The conditions”Each range is on or off, and the ground must pass every range that is on.
| Range | What it tests |
|---|---|
| Use height range | The ground’s height in meters above sea level, between Height from (m) and Height to (m) |
| Use slope range | How steep the ground is, in degrees, between Slope from (degrees) and Slope to (degrees); this is the same slope the paint tool’s Slope Gate (deg) tests |
| Use curvature range | How the ground bends, between Curvature from (1/m) and Curvature to (1/m): ridges and peaks are negative, valleys and hollows positive, and any flat or evenly sloping ground is zero |
Every range has a feather: past each end the fill fades out smoothly over the feather’s width, rather than stopping at a hard line. Inside the range the fill is at full strength. A feather of 0 is a hard edge.
Curvature scale (m) sets how wide a shape the curvature reads. A small scale picks out every bump and rut; a larger one reads the broad shape of a hillside, which is usually what you want on a mountain. Turn on VIEW > Slope / Curvature to see the numbers on the ground while you set the range (see below).
The masks
Section titled “The masks”| Mask | What it limits the fill to |
|---|---|
| Use layer mask | Cells where a ground texture or a biome (the Mask layer and Mask channel) is at least the Mask threshold, from 0 to 1. A ground texture is read as the ground shows it: its share of that cell |
| Biome mask | Only inside or Only outside the biomes you tick; a cell belongs to its strongest biome |
| Topology mask | Only inside or Only outside the topology bits you tick under Topology set; a cell is inside when it carries any of them |
A layer mask is how you keep a fill to an area you have already painted, for example to put Stones only where there is already Rock.
How each layer is written
Section titled “How each layer is written”| Layer | What a fill does |
|---|---|
| Ground texture | Blends the texture in by the rule’s weight times Fill strength, exactly as a paint stroke would, and takes the other textures out in proportion |
| Biome | Sets the biome on every cell the rule passes |
| Topology | Sets the topology you pick under Fill topology, or with Clear the bit instead takes it off |
| Alpha (holes) | Cuts holes, or with Fill holes instead fills them |
Biome, topology and holes are on or off: a spot is written where the rule passes at half strength or more. At a strength below 0.5 they write nothing, and the line under the preview says so. Tropical is one of the biomes; picking it turns the map’s Semi-Tropical mode on, as in Paint: Biome; see Tropical biome.
Fill inside a box
Section titled “Fill inside a box”- Set Region to Box.
- Press PICK BOX.
- Click one corner of the box on the map, then the opposite corner.
Esccancels.
The box is drawn on the ground in yellow, its corners are listed in meters under PICK BOX, and the preview and the fill stay inside it. The clicks that place the corners go to the box only, so they do not select, paint or sculpt whatever tool is active.
The preview
Section titled “The preview”Preview the fill (on by default) colors the ground orange where the fill will land, stronger where it writes more. It updates a moment after you change a setting, and again after any edit to the map while the window is open, so it always shows what APPLY FILL would do now. Closing the window hides the preview and the box.
VIEW > Slope / Curvature
Section titled “VIEW > Slope / Curvature”VIEW > Slope / Curvature colors the whole terrain by how steep it is, or by its curvature, without painting anything, and keeps up as you sculpt. Turning it on opens a small window:
| Setting | What it does |
|---|---|
| Color by | Slope or Curvature |
| Slope from (degrees), Slope to (degrees) | The slope range colored: blue at the gentle end, then green and yellow, red at the steep end |
| Curvature from (1/m), Curvature to (1/m) | The curvature range colored: ridges red, valleys blue, both deeper the stronger they bend, near flat faintly white |
| Curvature scale (m) | As in the fill: how wide a shape the curvature reads |
| Overlay opacity | How strongly the colors cover the ground |
Ground outside the range is left uncolored. Closing the window turns the view off, and the view always starts off when Creator starts; the ranges you set are kept.
Both windows can be dragged by their title bar and resized from their bottom-right corner, and they open where you last left them. The ? in the title bar opens this page.
Painting the same rule by hand is what the gates on Painting do inside a brush stroke; this tool does it across the map in one step. Where each layer lives in the map file is The map file and the sidecar.