
Preferences
Open Preferences with EDIT > Preferences… in the editor, or with the PREFERENCES button beside
HELP at the bottom of the start screen, so you can set the UI size, connect your AI client or update
game content before you open a map. It has five tabs, and every change applies immediately: there is
no OK button and nothing to confirm. The one exception is Scale UI, which applies when you let go of
the slider. CLOSE, the X, Esc or a click on the backdrop all close it. The title, the tabs and
CLOSE stay on screen at any window size; a tab taller than the window scrolls.
Every tab works with no map open. The one row that needs a map is Light multiplier on GENERAL (the camera light belongs to the editor view), which the start screen shows greyed out with that reason.
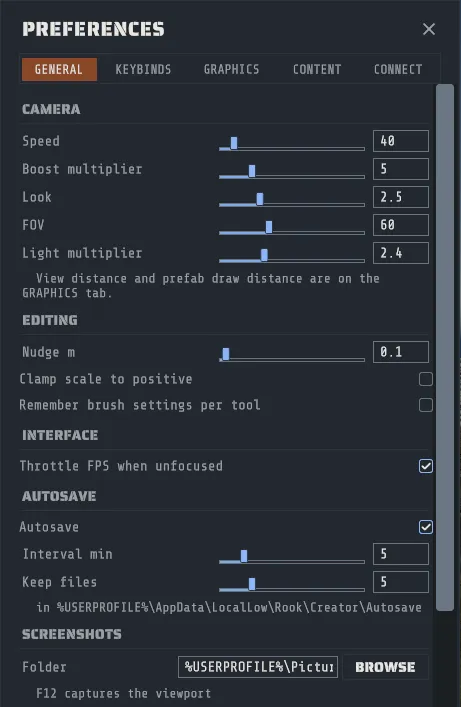
GENERAL
Section titled “GENERAL”| Section | Rows |
|---|---|
| Camera | Speed (how fast the fly camera moves, 10 to 400 meters per second here; the mouse wheel over the map changes it too, up to 2000, and this row follows it), Boost multiplier (the multiplier while you hold shift), Look (mouse sensitivity), FOV, Light multiplier (how bright the camera headlamp is) |
| Editing | Nudge m (the step the nudge shortcut moves a selection), Clamp scale to positive, Remember brush settings per tool |
| Interface | Throttle FPS when unfocused (caps the frame rate while Creator is in the background) |
| Autosave | Autosave, Interval min, Keep files, and the folder it writes to |
| Screenshots | Folder, with BROWSE, and a reminder of the key that captures the viewport |
| Display | Follow Windows display scaling, Scale UI with the size it applies, Mode (Fullscreen, Borderless or Windowed) and, in Windowed only, Resolution |
Four of those are worth a sentence each:
- Clamp scale to positive exists because negative scale renders correctly in Creator and breaks colliders in the actual game. On, a negative scale typed into the transform panel is flipped positive.
- Remember brush settings per tool gives Sculpt and Paint their own brush size, shape, opacity and gates. Off, they share one brush.
- Scale UI scales the whole interface, menu bar, panels, the floating tool windows and text
together. With Follow Windows display scaling on (the default), Creator starts at the size
Windows uses for other apps on that monitor, and Scale UI adjusts it from there: on a 4K monitor at
150 % scaling, Scale UI at 100 % gives 150 %. The line under the slider says what is applied, for
example
Applied 150% = Windows 150% x 100%. The UI never grows so large that the window has less than 1280 by 720 of room, even if you ask for more; the line then sayslimited by window size. The tick on the track is 100 %, dragging catches it as you pass, and the new size applies when you let go. Creator follows the window to another monitor and rescales if its Windows scaling differs. - Mode decides how the window sits on the monitor. Fullscreen and Borderless always use the monitor’s own resolution, so the picture stays sharp. In Windowed you can drag the window’s edges to any size; Creator remembers the size you leave it at, shows it under Resolution, and returns to it the next time you switch back to Windowed. The maximize button in the top-right corner switches between Windowed and full screen the same way.
The camera’s View distance and the prefab draw distance used to be on this tab and are now on the GRAPHICS tab with the other distances, which is where a dim line under Camera points you.
KEYBINDS
Section titled “KEYBINDS”Every shortcut Creator registers, grouped, with its current binding. Click a row’s binding to rebind
it: Creator captures the next key you press, and Esc cancels the capture without changing anything.
RESET ALL puts every binding back to its default, after asking, because it cannot be undone.
Two actions on one key are allowed and reported rather than refused. The tab says
Two actions share a binding; clashes highlighted below. and outlines both rows, so you can see the
clash and decide which one to move.
Below the rebindable rows are three sections of fixed grammar that no panel can change, listed there precisely because people go looking for them: the fly camera’s look, boost and speed; select, marquee, the group selectors and the paint channel digits; and the diagnostic keys. Keyboard shortcuts is the same information as a page you can read without opening the app.
GRAPHICS
Section titled “GRAPHICS”Screenshot: the PREFERENCES window on the GRAPHICS tab, tier at the top and the distance rows under it. (
images/preferences-graphics.png)
Tier runs from 0 · Potato to 6 · Ultra and defaults to 4 · High. It is a preset, not
just a knob: it sets shadow quality, distance and cascades, level of detail bias, texture resolution
and streaming budget, anisotropic filtering and how many lights can affect one object together, and
picking one puts every row below it back to that tier’s own values. Drop it if the viewport is slow,
raise it when you are judging how the map looks, then adjust the individual rows from there.
Distances
Section titled “Distances”| Row | Range | What it does |
|---|---|---|
| Draw distance | 0 to 6000 m, or the map’s size if that is larger | How far around the camera prefabs load. 0 keeps the automatic radius, which is the map size divided by three, so 1333 m on a 4000 m map. |
| View distance | 1000 to 12000 m | The camera’s far clip. Nothing at all renders past it. |
| LOD distance | 0.5 to 3.0, tier default | How long the detailed version of a prefab holds before a cheaper one takes over. |
| Shadows (m) | 0 to 500 m | How far shadows are drawn. 0 keeps the tier’s distance. |
Draw distance is the one to raise if props, rocks and monuments stop nearer than you want, and it is live: drag it and the world fills in without a reload. It costs frame rate and memory in proportion, which is why the automatic radius is what the system requirements were measured against.
A prefab cannot be drawn past the far clip, so the two distances are kept coherent for you: raising the prefab draw distance above the view distance raises the view distance to match, and the view distance cannot be dragged below the prefab draw distance. That is the trap this tab exists to close. Raising the draw distance while the far clip sat below it used to do nothing visible.
LOD distance is the level of detail bias, and it is the third reason distant things can look wrong rather than absent: the mesh is drawn, but it is the cheap one. Raising it holds the detailed meshes further out. Cliffs and rocks do not respond to it, because they are drawn as a single mesh bounded by the prefab draw distance alone.
Textures
Section titled “Textures”| Row | Options | What it does |
|---|---|---|
| Texture size | Full, Half, Quarter | Half and Quarter drop the largest mip level, which saves video memory and softens every surface. |
| Filtering | Off, On, Force | Anisotropic filtering, which keeps ground and road textures sharp at a glancing angle. Force applies it to every texture. |
| Streaming MB | 256 to 8192 MB, tier default | The video memory the streamed textures may use. A budget above the card’s free memory makes things worse, not better. |
Frame pacing
Section titled “Frame pacing”VSync matches the monitor and Frame cap limits the frame rate to Off, 30, 60, 120, 144 or 240. VSync wins when it is on, so the cap does nothing then, and the cap you pick here is what the GENERAL tab’s Throttle FPS when unfocused returns to when the window gets focus back.
Terrain
Section titled “Terrain”Terrain error is how many pixels of terrain shape error Unity may allow before it draws more
triangles, 1 to 20 with 5 the default. Lower is a sharper skyline and costs frame rate. It is
the only Unity terrain setting on the tab because it is the only one Creator’s terrain actually uses:
Rust’s grass and trees are prefabs, bounded by the prefab draw distance above, so Unity’s own detail
and tree distances would be controls that do nothing.
Every row is saved between sessions, and a diagnostic or batch run ignores all of them and uses the tier alone, so a screenshot or a comparison run cannot shift because of a setting you changed.
CONTENT
Section titled “CONTENT”The same content controls as the start screen, in the editor. Active content names the Rust
build your snapshot came from, its size on disk, when it was synced, and whether it pins the world
generator. Update game content re-syncs from your Rust install, behind a confirm because it is a
copy of tens of gigabytes. It only works with no map open, because an update reloads every game asset:
while a map is open the button is greyed out and says
Close the map first (FILE, Unload Map), then update game content. Opened from the start screen, it
is live. While a sync runs, its progress line shows here with a Cancel sync button that stops it
and leaves your content unchanged. While it waits for Steam to finish updating Rust, a Check again
button beside it looks at the install straight away
(When Steam is updating Rust). Snapshots lists every snapshot you have with its size and a
Delete on each one that is not active, also behind a confirm, plus the total on disk.
CONNECT
Section titled “CONNECT”Creator can run a small server on this PC that lets your own AI client drive the editor. It is off until you turn it on, it listens on this machine only, and it requires a token.
| Control | What it does |
|---|---|
| Port | The port to listen on. |
| START | Starts the server and mints this session’s token. |
| STOP (kill switch) | Stops it and invalidates the token, so every client holding it is refused from that moment. |
| Token | This session’s bearer token. It changes every time the server starts. |
| Claude Code / Claude Desktop | The exact line to add Creator to that client, with a COPY button. |
| Connected client | What has connected, and the protocol it negotiated. |
| Tool calls | Every call your client has made, with CLEAR LOG. |
Follow Connect Claude Desktop or Connect Claude Code rather than working from the fields: those pages are checked against the recipes this tab copies.
The Relay block below is for web clients, which can only reach a public address. Creator dials out to a relay you name, so no port is opened on this PC: PAIR links it, Endpoint is the address you add in the client, Pairing code is what you type on the relay’s consent page, and UNPAIR (kill switch) revokes everything, the local token included.
Your license
Section titled “Your license”Your Creator license lives in the Crucible launcher, not in Preferences, so there is no license tab. You buy it in the launcher’s Shop tab and activate it in its Account panel, and Creator checks it each time it starts: Install Creator says what the license window shows when that check fails. How many PCs a license covers, renewals, and freeing a PC with Deactivate are in Licenses and account.