
Scatter
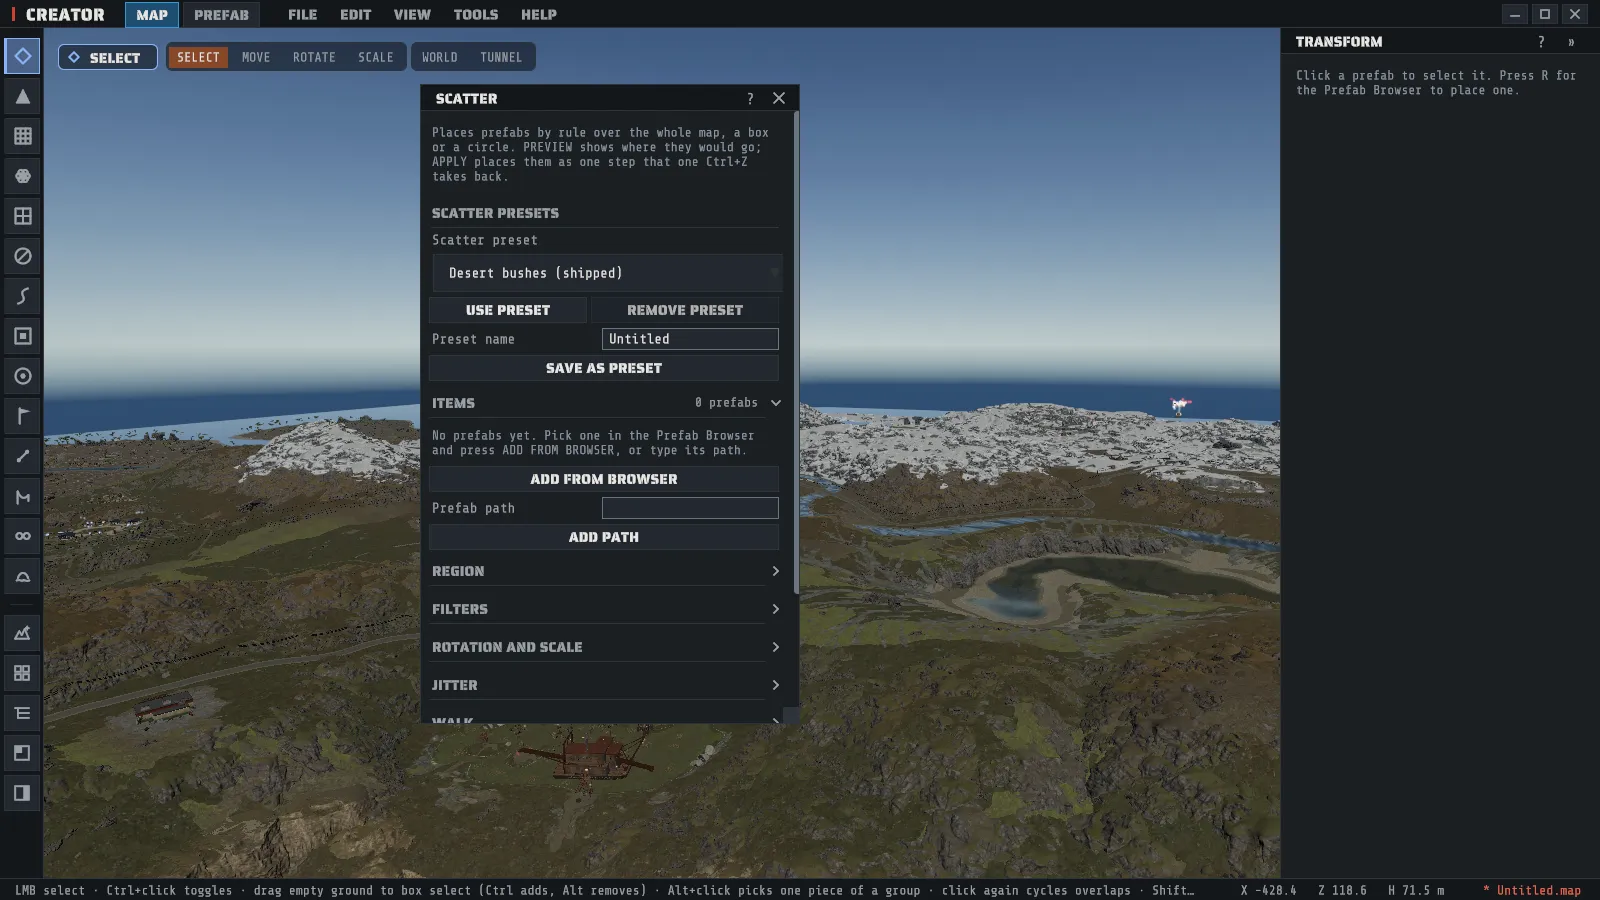
The scatter tool places many prefabs at once, by rule: which prefabs, how many, where the ground allows them, and how each one is turned, sized and seated. You see where they would go before anything is placed, and one Ctrl+Z takes a whole scatter back.
Open it from TOOLS > Scatter…. It is a window you can drag by its title bar and resize from its bottom-right corner; it opens where you left it, its ? opens this page, and the camera, the selection and the other panels keep working while it is open.
Scatter something
Section titled “Scatter something”- Add the prefabs. Click a prefab in the Prefab Browser and press ADD FROM BROWSER, or type its path in Prefab path and press ADD PATH. Each prefab has a weight: one with weight 3 is drawn three times as often as one with weight 1, and weight 0 is never drawn. The weight is the number beside each prefab in the list.
- Choose the region under Region: Whole map, Box or Circle. For a box press PICK BOX and click two corners on the terrain; for a circle press PICK CIRCLE and click its center. The circle starts at your brush size, and Circle radius (m) changes it. Esc cancels a pick.
- Choose how many under Amount by: a Count, or a Density per hectare of the region.
- Press PREVIEW. Each prefab that would be placed shows as an outlined box, and the line under the buttons says how many and why the rest were turned down.
- Press APPLY.
The same settings and the same Scatter seed place the same prefabs in the same spots, so a preview you like is exactly what APPLY places. RANDOM picks a new seed. While the preview is showing, a change to any setting redraws it a moment after you stop typing; HIDE PREVIEW turns it off.
One scatter places at most 5000 prefabs. A density that asks for more over a large region is cut to 5000, and the readout says so.
Take it back
Section titled “Take it back”Ctrl+Z undoes the whole scatter in one step, like any other edit. CLEAR LAST does the same while the scatter is still your newest edit. If you have edited since, CLEAR LAST removes only the prefabs the scatter placed, as a new step, and keeps everything you did after it.
Where the ground allows a prefab
Section titled “Where the ground allows a prefab”Every rule under Filters is read at the spot the prefab finally stands on.
| Rule | What it keeps |
|---|---|
| Filter by height | Ground between the Ground height (m) floor and ceiling. Sea level is 0, so a floor above 0 keeps prefabs out of the sea. |
| Filter by slope | Ground whose slope, in degrees from level, is in Slope (degrees). |
| Filter by curvature | Ground whose Curvature is in the range: hollows and valleys are positive, ridges and bumps negative, flat ground is 0. |
| Biomes | Only the ticked biomes. None ticked means any biome. |
| Only on topology | Only ground that carries at least one ticked topology. None ticked means no limit. |
| Never on topology | Never ground that carries a ticked topology: roads, rivers and monuments, for example. |
How each prefab is turned and sized
Section titled “How each prefab is turned and sized”The steps run in this order for every prefab, under Rotation and scale and Jitter:
- Align to the terrain normal tilts the prefab so its up follows the slope. Off, it stands straight up.
- Spin (degrees) turns it by a random amount about its up, so aligned rocks stay flush with the slope.
- Rotation X, Rotation Y and Rotation Z add a random turn about the prefab’s own axes.
- Scale range sizes all three axes by one random amount. Turn Uniform scale off to use Scale X, Scale Y and Scale Z instead.
- Two kinds of random offset: along the ground (Along the normal (m), Across the slope (m) and Down the slope (m)) and along the world axes (Jitter X (m), Jitter Y (m) and Jitter Z (m)).
- Sink (m) pushes the prefab into the ground along the slope; a negative value lifts it.
Every one of these is a range: two numbers, the lowest, then to, then the highest, and each prefab gets its own random value between them. Set both to the same number for a fixed value.
Walk to a better spot
Section titled “Walk to a better spot”With Walk to a better spot on, each prefab steps along the slope from where it was first put, Uphill or Downhill (Walk direction), Step (m) at a time, up to Max steps, as long as every rule still passes at the next step. It keeps the last step that passed. It also stops at a top (or a bottom) and on flat ground. Uphill puts rocks and cliffs on the crests of ridges; downhill gathers them in the valleys.
Keeping clear
Section titled “Keeping clear”| Setting | What it does |
|---|---|
| Keep away from existing prefabs | Turns a spot down when it is closer than Existing radius (m) to a prefab already on the map. |
| Keep away from each other | Turns a spot down when it is closer than Spacing (m) to a prefab this scatter already placed. |
| Ground test | Turns a spot down when a bottom corner of the prefab would float above the ground by more than Ground gap (m). A bottom under the ground is fine: Rust’s own rocks reach well below the surface. |
The two distances are measured between the prefabs’ outlines seen from above. At 0 the outlines may touch but not overlap. The ground test uses each prefab’s outline box, so a wide, flat rock placed level on a steep slope is turned down while the same rock aligned to the slope passes.
Presets
Section titled “Presets”A preset keeps the prefab list and every setting above, including the region kind and the circle’s radius. The box corners and the circle’s center are not kept, because they belong to one map.
- Type a name in Preset name and press SAVE AS PRESET.
- Pick one from Scatter preset and press USE PRESET to use it again.
- REMOVE PRESET removes the picked preset after asking (confirm with REMOVE PRESET, or GO BACK). The prefabs it placed stay on the map. It is greyed on a shipped preset, which cannot be removed; save a copy under your own name instead.
Creator ships with three presets, marked “(shipped)” in the list: small rocks on gentle ground, rock formations
that walk up the slopes, and bushes for the desert. Saving one under the same name keeps your copy and leaves the
shipped one as it was. Your presets are files under %LOCALAPPDATA%\RustCreator\scatter\, one JSON file each, so
you can copy them to another PC.
When nothing is placed
Section titled “When nothing is placed”The readout under the buttons names the three most common reasons the prefabs were turned down, with a count for each. The usual ones:
| The readout says | What to change |
|---|---|
| by slope, by height | Widen the range, or turn the filter off. |
| too close to each other | Lower Spacing (m), or ask for fewer. |
| too close to a prefab already there | Lower Existing radius (m), or pick a clearer region. |
| not sitting on the ground | Turn on Align to the terrain normal, raise Ground gap (m), or pick gentler ground. |
| outside the region | A large jitter is carrying prefabs over the edge. Lower it. |
The scatter tool works on the map. While you are editing a prefab in the workspace it asks you to switch to the MAP tab first.