
Procedural generation
Creator builds a whole world from two numbers, a size and a seed, by running Rust’s own generation passes in the game’s own order. You get terrain, biomes, topology, ground textures, monuments, roads, rivers, rails, powerlines, rocks and foliage, in one run, with nothing to place by hand.
Generate one from the start screen
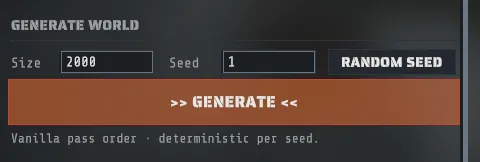
Section titled “Generate one from the start screen”- Find the GENERATE WORLD section on the start screen.
- Type a Size. Anything from 1000 to 6000, in meters along one edge.
- Type a Seed. Any whole number from 0 upwards, or press RANDOM SEED beside it to pick one you can still edit.
- Press >> GENERATE <<.
The line under the button says what you are getting: “Vanilla pass order · deterministic per seed.”
If either field is unusable the button stays disabled and the message tells you which one and why, for example “Map size must be between 1000 and 6000 (you typed 200).” Nothing falls back to a default size behind your back.
Size decides more than how far you walk. Rust skips whole generation passes below certain sizes, so a small map has no road ring and no mountains no matter which seed you pick. The thresholds are on How Rust builds a map.
While it runs
Section titled “While it runs”Generation takes minutes, and the loading screen is built so you can tell working from stuck. It comes up the moment you start the run, shows the pass that is running by name, its position in the ladder, a progress bar, an elapsed clock, and the seed and size you asked for, and stays until the map is finished.
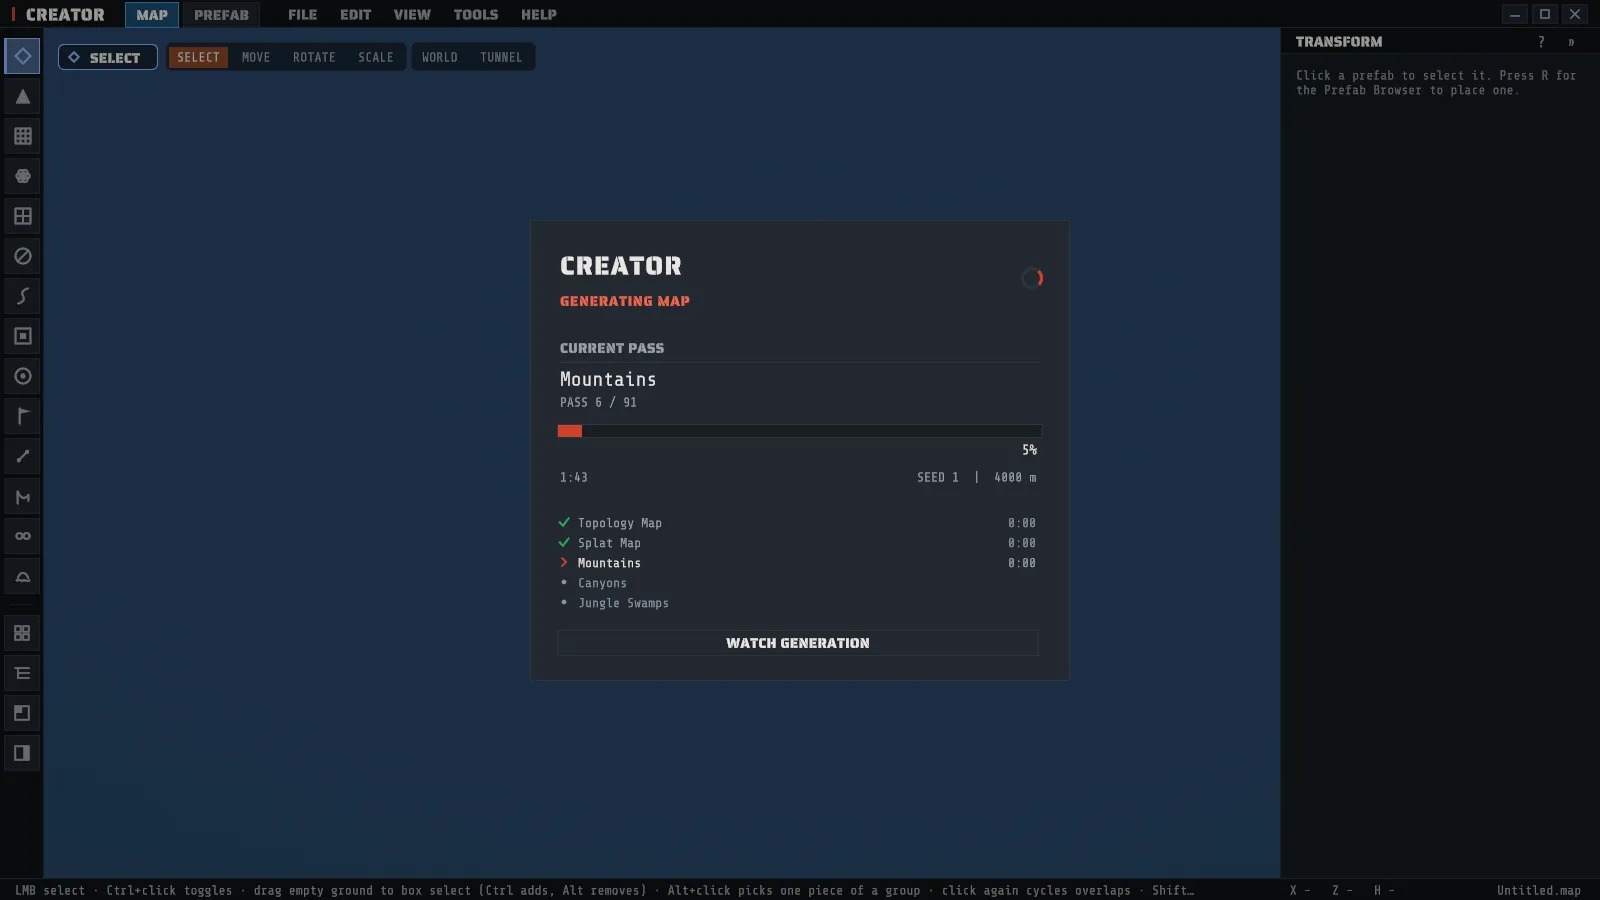
- The bar moves at pass boundaries, not smoothly. A heavy pass holds one name for minutes. That is normal.
- The spinner and the clock keep moving regardless. They are what tell you the run is alive.
- WATCH GENERATION shrinks the overlay to a small pill in the corner, showing the percentage and the current pass, so you can watch the world being built. Click the pill to bring the full overlay back.
- CANCEL is in the full overlay. A generation you started yourself can always be canceled.
Why it takes as long as it does, and what to do about it, is in the FAQ.
The same seed gives you the same map
Section titled “The same seed gives you the same map”Generation is deterministic: the same size and the same seed produce an identical world, every time, on any machine. That is Rust’s own behavior and Creator keeps it.
With one condition, and it is the one thing on this page worth remembering:
A seed reproduces a map only against the content snapshot it was generated on.
If you care about reproducing a map later, write down the size, the seed and the snapshot build id together. Two of the three are not enough.
Generating onto a map you already have
Section titled “Generating onto a map you already have”The start screen’s button generates a fresh world. Inside the editor you can instead run chosen passes onto the map that is open, which is how you finish a terrain somebody else shaped.
- Open TOOLS > Procedural Generation….
- Check the passes you want. They are grouped as Terrain / Splat, Monuments, Paths / Roads and Rocks / Decor, with ALL and NONE to set the lot.
- Set the Seed on the right, or press RANDOM for a new one.
- Press >> RUN SELECTED PROCEDURAL COMPONENTS <<.
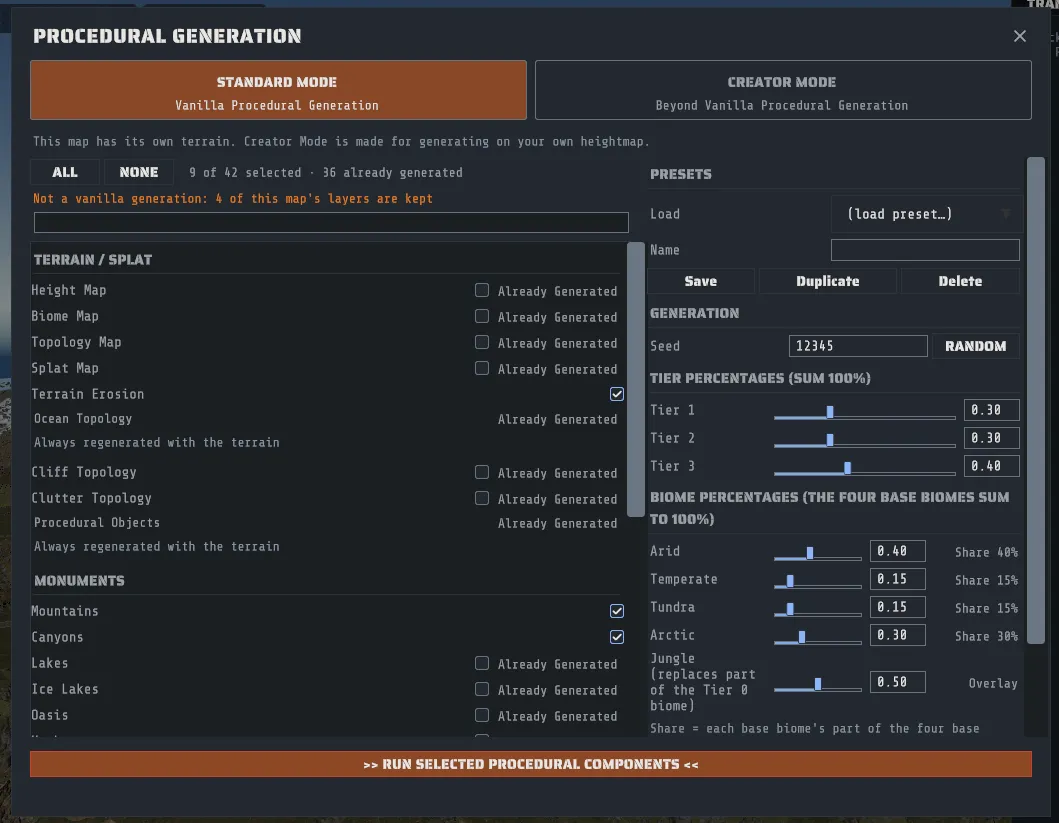
Run only the passes whose content the map does not already have. Running the monument passes on a map that already has monuments gives you two sets, not a better set. The same goes for cliffs, rocks and roads. This is the whole trick to finishing a Crucible Heightmap island, and the panel now does most of the work of getting it right for you.
Standard Mode and Creator Mode
Section titled “Standard Mode and Creator Mode”The top of the panel is a switch with two sides, and it stays in view however far you scroll.
- STANDARD MODE, Vanilla Procedural Generation, is Rust’s own generator and nothing else. With Height Map, Biome Map, Topology Map and Splat Map all checked, a run on a new blank map gives you the same map a Rust server builds from that size and seed. You can still uncheck a terrain row to keep that layer (see below), and when you do, one line under ALL / NONE says Not a vanilla generation (hover over it for which layers are kept and why), and the confirm dialog says so too.
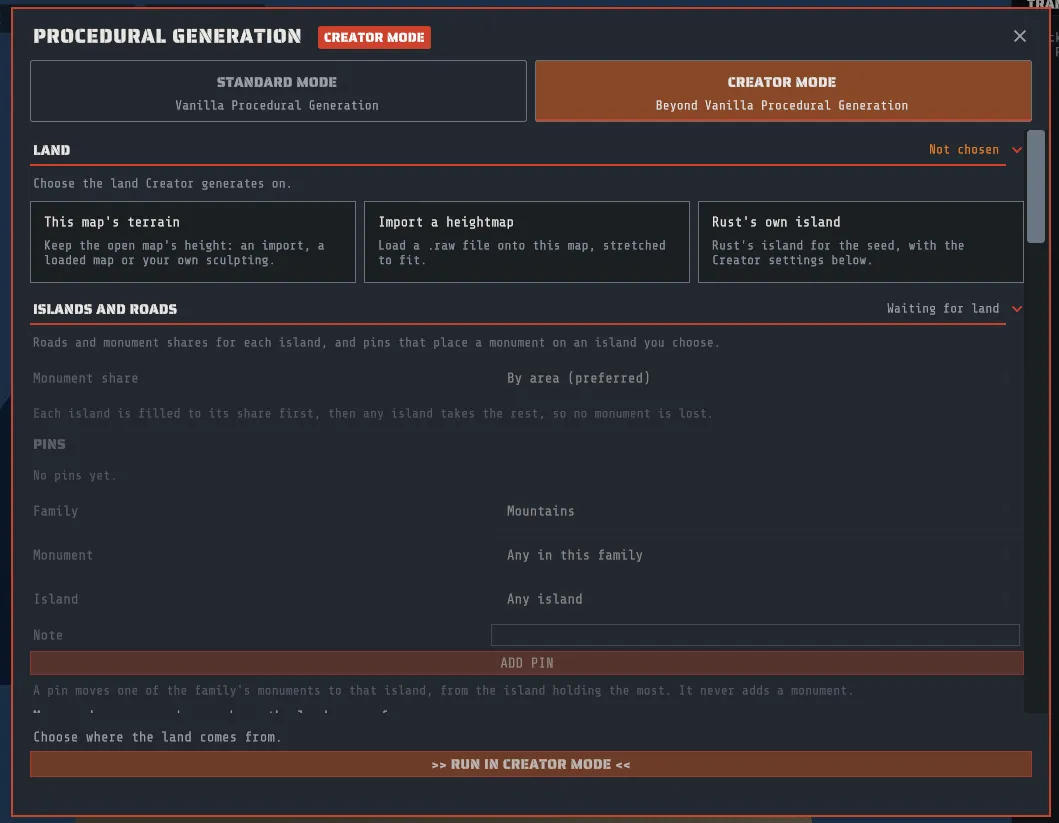
- CREATOR MODE, Beyond Vanilla Procedural Generation, is for generating on a heightmap you bring, with the monuments you choose and, when your land is a group of islands, bridges and one road around them. The window’s outline turns red, a CREATOR MODE badge appears beside the title, and the run button reads >> RUN IN CREATOR MODE <<, so the mode is plain without relying on color. The confirm dialog opens with “Creator Mode: this map will not be a vanilla generation.” and then names the land, how many monuments are left out (and, when you changed any, how many families have a changed count), how many are pinned, and whether bridges are on.
The panel opens in Creator Mode when the map that is open already goes beyond vanilla, and in Standard Mode otherwise. It opens in Creator Mode when:
- the map was made in Creator Mode, or its recipe uses a Creator setting (your own heightmap, an island layout, bridges, monument pins, monuments left out, or the Tropical biome). It opens with that map’s settings.
- the map has terrain of its own that is not shaped like Rust’s own island. Rust’s island is always one landmass over the middle of the map with open sea to every edge (measured on maps a Rust server generated), so the panel opens in Creator Mode when land reaches the map edge, when the land is several islands, when the land is off the map’s middle, or when the terrain has no island at all. A few small islets off the coast, as Rust’s own maps have, do not count.
When it opens in Creator Mode for one of these reasons, one line under the switch says why, for example “Opened in Creator Mode: land reaches the map edge; the land is several islands. Rust’s own island is one landmass over the map’s center, with open sea to every edge.” A new blank map, and a map shaped like Rust’s own island, open in Standard Mode. On a map that has terrain of its own, Standard Mode shows one line under the switch: “This map has its own terrain. Creator Mode is made for generating on your own heightmap.”
You can always switch, and your choice wins: once you pick a mode on a map, the panel opens in that mode every time you open it again on the same map, whatever it would have chosen. Opening or creating another map starts from the rule above again. Loading a preset counts as your choice too.
Switching is instant and runs nothing. Anything you set in Creator Mode is kept when you switch back to Standard, and the footer says so, but a Standard run does not use it. That includes a map you saved from a Creator run: pressing RUN in Standard Mode on it generates Rust’s own island, with no bridges and no monuments left out, whatever the map’s recipe says.
The GENERATE WORLD button on the start screen is always Standard Mode. To start a Creator Mode map from nothing, press CREATE BLANK at the size you want, then open TOOLS > Procedural Generation…. Each Creator section starts closed; click its heading to open it, and it stays open the next time. What each Creator section does is in Generating on your own heightmap below.
The panel knows what your map already has
Section titled “The panel knows what your map already has”Every time you open the panel, Creator looks at the map that is open and works out which of these components it already carries. It reads the map itself, not a record of what was generated, so it is right about a map you loaded from a file, one somebody sent you, and one you built from an imported heightmap.
- A component your map already has is marked Already Generated, and it starts unchecked.
- Everything else starts checked, exactly as before.
- Tick a marked row back on and Creator asks first: “This map already has Height Map. Generating it again replaces it. Continue?” Press CONTINUE to tick it or GO BACK to leave it unticked. It asks once per component while the panel is open, not every time you click, and ALL asks once for every marked row.
- The count beside ALL / NONE reads, for example, 38 of 42 selected · 5 already generated.
So on a map you imported, pressing >> RUN SELECTED PROCEDURAL COMPONENTS << straight away adds what the map is missing and leaves what it has, which is what you almost always want. On a map you just created there is nothing in it yet, so nothing is marked and nothing changes.
Unchecking a terrain row keeps that layer. The four rows in Terrain / Splat that name a layer, Height Map, Biome Map, Topology Map and Splat Map, are the ones the rest of the run is built on. Leaving one unchecked keeps your map’s own layer and generates everything else from it: with Height Map unchecked, the biomes, topology and ground textures are worked out from your terrain rather than from a shape Rust invented. Unchecking Height Map keeps the map’s water with it, because the two are one thing.
Some rows have no checkbox. A few components are part of building the terrain and cannot be run or skipped on their own, so instead of a box they say Always regenerated with the terrain. A checkbox that did nothing would be worse than none.
Undoing a generation
Section titled “Undoing a generation”A generation you start from this panel is one undo step. Before the run, Creator stores a complete copy of the map that is open, and Ctrl+Z puts that map back, terrain layers, prefabs, paths and all. Redo brings the generated map back. This works for a run you cancel half way too.
The confirm dialog, GENERATE MAP, has two buttons: CONTINUE starts the run and GO BACK returns to the panel without running anything. It tells you which way the undo is going to be, so read that line:
- “Generating replaces the current terrain; UNDO restores it.” The copy was stored. Ctrl+Z works.
- “Generating replaces the current terrain and every edit, and CANNOT be undone.” No copy was stored, and the reason is in brackets after it. The usual reason is that a copy of a very large map does not fit the memory the undo history is allowed to use.
Putting a map back is a full reload, so on a large map it takes as long as opening one does. And the generation from the start screen is not undoable at all: there is no earlier map to go back to, because that run made the map.
The controls on the right
Section titled “The controls on the right”| Control | What it does |
|---|---|
| STANDARD MODE / CREATOR MODE | The switch at the top of the panel, described above. Every control in this table is in both modes. |
| Seed | The seed the selected passes run with. RANDOM picks one for you. |
| Tier Percentages (sum 100%) | How the map’s area is split across the three monument tiers: Tier 1, Tier 2, Tier 3. Normalized to 100% for you. |
| Biome Percentages (the four base biomes sum to 100%) | The weight of each base biome: Arid, Temperate, Tundra, Arctic, kept at 100% together as one moves. Jungle is separate: it replaces part of the Tier 0 biome, the way a Rust server’s own setting does, and moving it changes nothing else. The defaults are a Rust server’s own (Jungle 0.50). |
| Biome preset | Creator Mode only, above the biome sliders: Vanilla (Rust’s own weights), Winter, Arid or Jungle sets the five weights at once. Moving a slider afterwards makes them your own, and the dropdown then reads Custom. |
| Prefab Filters | Blacklist and Whitelist, described below. |
| Presets | Save the whole panel under a name, described below. |
The blacklist and the whitelist
Section titled “The blacklist and the whitelist”Both fields take a list of text fragments, separated by commas or semicolons, and both are matched against the prefab’s own path, case insensitively, as a substring.
- A prefab whose path contains any Blacklist fragment is never placed.
- If the Whitelist is empty, everything else is allowed. If it has anything in it, only prefabs matching one of its fragments are allowed.
- The blacklist wins: a prefab matching both is excluded.
So oilrig, cave keeps oil rigs and caves off the map, and a whitelist of rock generates a map of nothing
but rocks, which is occasionally useful and mostly a good way to see what a pass does.
Presets
Section titled “Presets”A preset is a named snapshot of the whole panel: the seed, the tier and biome percentages, which passes are checked, both filters and the mode. A preset saved in Creator Mode also keeps the Creator settings: the monuments left out, the pins, the island share and the bridge settings. Where the land comes from is not in a preset, because it belongs to the map that is open. Loading a Creator preset switches the panel to Creator Mode. A preset saved before the switch existed loads in Standard Mode.
- Type a name in Name.
- Press Save.
- Load it later from the Load dropdown. Duplicate copies the current state under a new name, and Delete removes the selected preset.
Presets live in one file, procgen-presets.json, in Creator’s own data folder, so they survive an update and
follow you between maps rather than between machines.
Generating on your own heightmap (Creator Mode)
Section titled “Generating on your own heightmap (Creator Mode)”Creator Mode runs Rust’s own generation passes over land you bring: a heightmap from World Machine, Gaea, Crucible Heightmap or any other terrain tool, a map somebody sent you, or terrain you sculpted yourself. The biomes, topology, ground textures, monuments, roads, rivers and rail are all worked out from that land rather than from the island Rust would have made for the seed.
Switch the panel to CREATOR MODE and six sections appear above the component checklist, in this order: LAND, ISLANDS AND ROADS, BRIDGES, MONUMENTS, TROPICAL and DEEP SEA ISLANDS. Each starts closed, with a short summary at the right of its heading (This map’s terrain, 4 islands, On, one loop, 42 of 42 monuments included, Off, Off); click a heading to open it. LAND opens by itself while no land is chosen, because the run waits on it. The components, seed, percentages, filters and presets below them work exactly as they do in Standard Mode.
LAND: where the height comes from
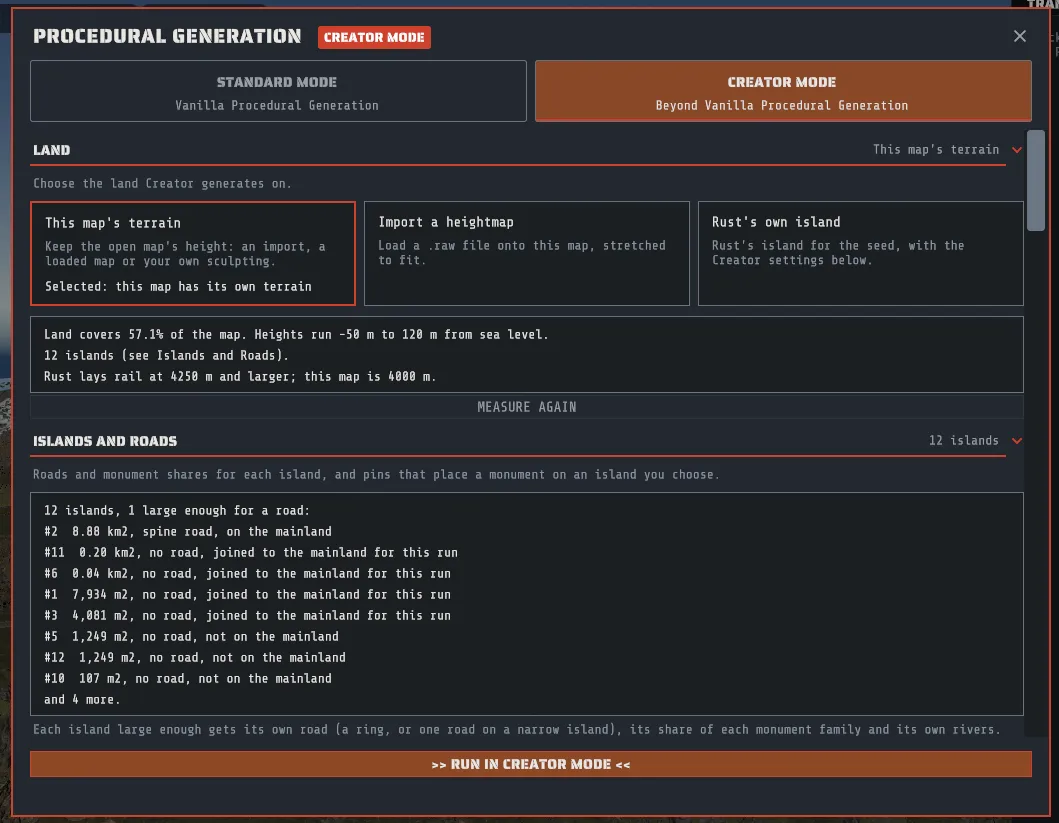
Section titled “LAND: where the height comes from”Three choices, and the run button stays disabled with “Choose where the land comes from.” until one is picked. On a map that has its own terrain, This map’s terrain is already picked for you.
- This map’s terrain keeps the open map’s height and its water, whatever made them: an import, a loaded map or your own sculpting. Everything else is generated from that height.
- Import a heightmap brings a
.rawfile in from the panel itself, with the same Bit Depth and Byte Order as the Sculpt tool’s import (see Import a heightmap). The file is stretched to fit the open map, the import is one undo step, and afterwards This map’s terrain is picked. The section shows the open map’s size, because a heightmap takes the size of the map it lands on; change the size first in Map Tools if you need to. - Rust’s own island keeps no height: Rust’s island for the seed, with the Creator settings below it. Use it when you want a vanilla island but your own choice of monuments.
While Height Map is decided by LAND, its row in the checklist is locked and says which way it went, for example “Set by Land: this map’s terrain is kept”.
The pre-flight card. Once the land is picked, Creator measures it and prints a short card before anything runs: how much of the map is land and the height range, how many islands it found, and whether this map size carries rail (Rust lays rail at 4250 m and larger). The islands themselves are listed in ISLANDS AND ROADS, largest first, each with a number, its area, the road it can carry (a ring road, a single road across a narrow island, or none for an island too small for a road, just as Rust’s own small islands have none: an island needs at least 0.25 km2 for a road, and a map needs to be 4000 m or larger for island roads at all) and whether it joins the map’s mainland; the straits between them are listed in BRIDGES, narrowest first, each with its width and whether a bridge can span it. The island numbers are the ones every section uses, so a pin names island #2 and means the island listed as #2. MEASURE AGAIN re-reads the land after you change it.
When the land is not ready, the card offers the fix, each problem in orange with its fix directly under it. Each fix is one undo step, and the card measures again afterwards.
- Almost all land, or almost all sea. A heightmap exported with its sea at its lowest value reads as one big continent. SET SEA LEVEL picks which height of your heightmap becomes the shoreline (the Shoreline (m) slider) and moves the terrain so that height lands at sea level, with a small map preview of the new coastline before you apply it.
- Land touching the map edge. Rust needs open water around the map for the ocean border and the offshore oil rigs. SINK THE MAP EDGE lowers the outer margin smoothly to the seabed over the width you choose, and leaves the rest of the map untouched.
An island too small for a road, or a strait wider than the longest bridge, is not a problem to fix: the island keeps no road, and those two islands stay unjoined unless you raise the longest bridge in BRIDGES.
ISLANDS AND ROADS
Section titled “ISLANDS AND ROADS”This section lists the islands the pre-flight measured and is live when it finds two or more islands, or one island with a bay a bridge can cross. On Rust’s own island it explains that there is one landmass and nothing to share.
- What each island gets is shown as a fact rather than a switch: each island large enough gets its own road (a ring, or one road on a narrow island), its share of each monument family and its own rivers. With bridges on and one loop around the islands (see BRIDGES), the loop takes the place of the separate rings.
- Monument share. By area (preferred) is the default: each island is filled to its share first, then any island takes the rest, so the map never places fewer monuments than Rust would. By area (strict) holds every island to its share, even if that places fewer monuments.
- Pins put a monument on the island you choose. Under Pins, choose a Family, optionally one Monument of it, and an Island number from the list above (or Any island), then ADD PIN. A pin moves one of the family’s monuments to that island, from the island holding the most, so it never adds a monument to the map; naming one monument records which one you had in mind. REMOVE takes a pin off.
BRIDGES
Section titled “BRIDGES”Like ISLANDS AND ROADS, this section is live when the land has two or more islands, or one island with a bay. It lists the crossings your land offers, narrowest first, and says in plain words what the bridge law will do with the settings you have.
| Control | What it does |
|---|---|
| Build bridges | On by default when the land has a crossing the longest bridge spans, off when it has none. The line under it says which, until you flip it yourself. |
| Island roads | One loop around the islands (the default) or Separate rings, joined by bridges. Both are described below. |
| Rail follows the road loop | On a map of 4250 m or larger, the rail runs as one loop inside the road loop. Off gives each island its own rail ring, joined across the same bridges. Below 4250 m Rust lays no rail at all, and the setting is kept for a larger map. |
| Longest bridge (m) | The widest strait a bridge may span. 300 m by default and never more than 400 m. |
| Deck clearance (m) | How high each deck sits above the water, 15 m by default. The line under it says which boats can pass under. |
| Bridge style | Concrete (one continuous span), the default, or Ferry bridge (one piece per crossing), the game’s own ferry bridge piece. |
After a run the section says what happened, for example “Last run: the loop closed, with every crossing carried.”
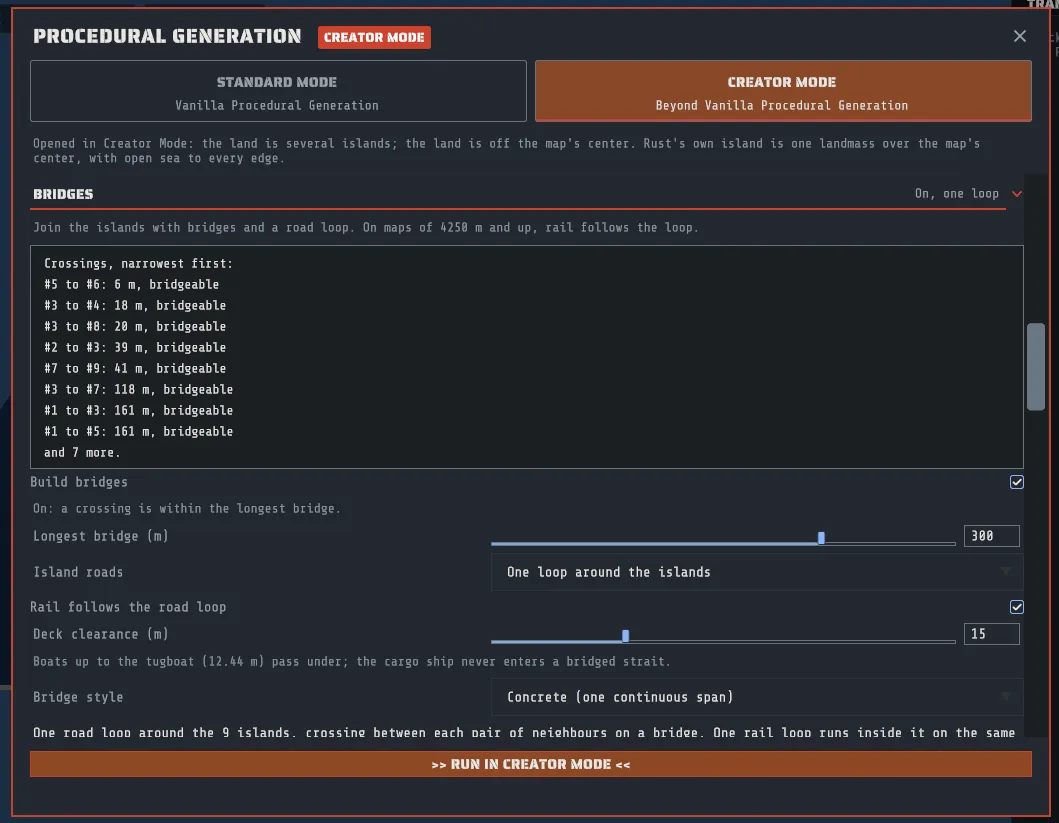
Where a bridge goes. Creator measures every strait between two islands and picks the crossings that make one road network out of the whole group, shortest first. With one loop around the islands it takes one crossing on every strait the loop needs instead, so the road can go all the way round. A strait wider than the longest bridge is left unbridged, and one wider than 400 m always is, so that the game’s own cargo ship route can never be blocked. The cargo ship never enters a bridged strait.
What a bridge looks like. By default it is a continuous concrete deck, as wide as the road on it, with parapets down both edges, rectangular piers to the seabed, and an abutment buried in each shore. The piers are spaced to leave 36 m of clear water between them, which is twice the width of the widest ship a player can build, so a boat can pass between them rather than having to go round. The game’s ferry bridge piece is the other style, but only one piece fits on a crossing, so a long strait is refused in that style.
Where the road meets it. The road climbs a ramp on each shore and stops flush on the bridge, and the deck’s own surface carries the road markings across. Rust rebuilds every road’s mesh by pressing it onto the ground when a map loads, so a road cannot be drawn in mid-air over a strait: the deck IS the road across the water. Ramps vary a little in length and steepness from bridge to bridge, which is deliberate.
Rails can cross a bridge, because Rust treats a rail’s height as authored rather than pressing it onto the ground. Rust lays no rail network at all below 4250 m, so on a smaller map the rail settings change nothing, and the run says so in the generation log.
Every bridge is a no-build zone. The deck, both abutments and the ramps carry the game’s own no-building volume with a margin, from below the seabed to well above the deck, so nobody can build a base on the bridge or wall off its approach. The editor outlines these zones when VIEW > No-Build Zones is on (it starts off).
One road and one rail around the islands
Section titled “One road and one rail around the islands”When your land is a group of islands, such as several islands around open water, two islands side by side, or one island curled round a bay, One loop around the islands lays one ring road around the whole group instead of a separate ring on each island. It crosses every strait it needs on a bridge (a bay mouth included), so you can drive all the way round without doubling back, and it is the map’s one main road, the way the single ring road is on an ordinary Rust map.
On a map of 4250 m or larger it also lays one rail loop around the group. The rail runs inside the road, crosses on the same bridges on its own lane of each deck, with a concrete divider between the rail and the road, and both lines straighten out as they reach a bridge so they arrive side by side rather than swerving onto the deck. The rail loop is the map’s main line, so the game’s own rules then run spur lines off it to the monuments that have a rail connection, such as the train yard and the tunnel entrances, and add their usual branches and sidings. Below 4250 m Rust lays no rail, so there is only the road loop.
When the loop does not fit. An island the loop cannot reach keeps its own road (a ring, or a single road across it if it is too small for a ring) and, on a large map, its own rail, and a bridge joins it to the rest. If the loop cannot be built at all, for example because an island between two bridges is too short for both ramps, Creator does not leave a loop with a gap in it: the whole map goes back to one ring per island, joined by bridges. The BRIDGES section and the generation log say which one you got.
The same two choices exist as launch switches for scripted runs: -noarchipelagoloop gives one ring per
island joined by bridges (the rail loop goes with it, because it sits inside the road loop), and
-noarchipelagorail keeps the road loop and gives each island its own rail ring again. A switch on the
command line wins over the panel.
MONUMENTS: choosing what may be placed
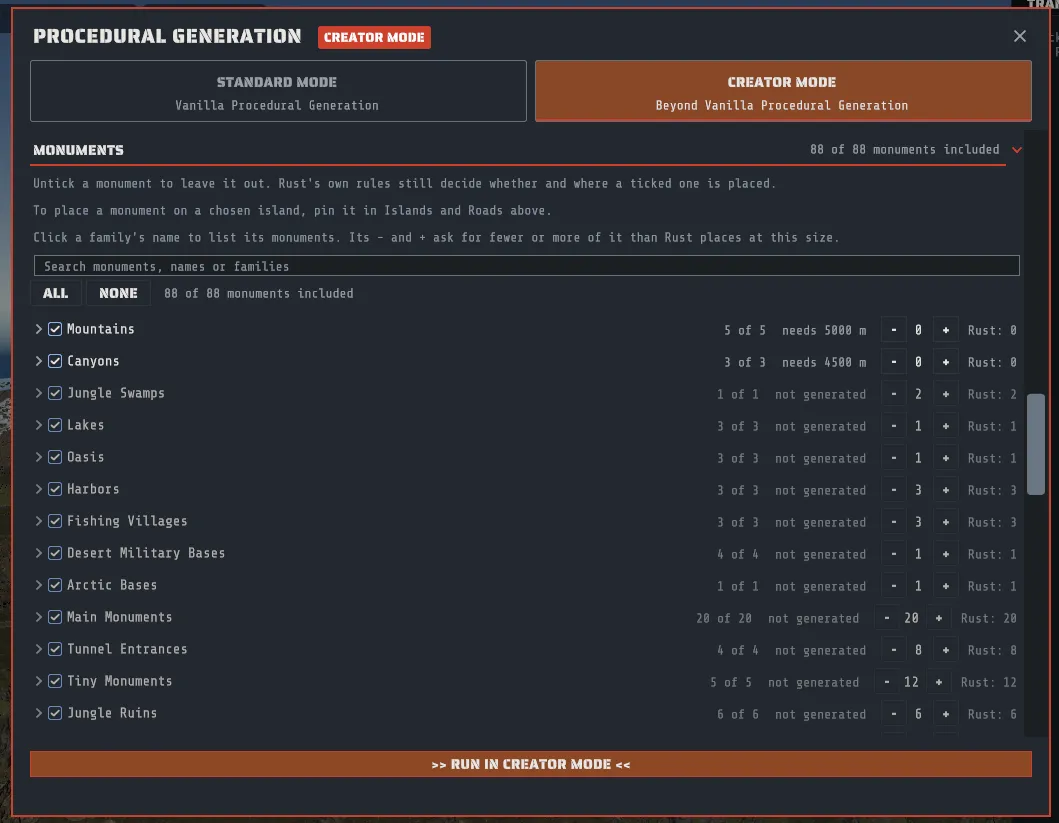
Section titled “MONUMENTS: choosing what may be placed”Every monument your Rust content carries is listed, grouped by the family that places it, in the order Rust places them: from mountains, canyons and lakes, through harbors, the main monuments by size and the tunnel entrances, to caves, the underwater labs, the offshore oil rigs and lighthouses. Train tunnel pieces are not monuments and are not listed.
Each family is one line, closed to start with, so the whole list fits on one screen. A family’s line carries, left to right: an arrow that opens it, a checkbox for the whole family, the family’s name, how many of its monuments are ticked (3 of 3), and its count, - 3 + with Rust’s own count beside it (Rust: 3). Click the arrow or the family’s name to show its monuments as checkboxes, two or three to a row depending on how wide the panel is; click again to hide them. Creator remembers which families you left open until you close the app. Hover a family’s name to see what Rust places of it at this map size.
- Ticked means eligible. Rust’s own placement rules still decide whether it lands and where: biome, terrain, spacing, the map size, and how many of that family the map gets.
- Unticked means never placed. That is all it means: it does not make another monument more likely to appear in its place.
- A family’s checkbox includes or leaves out every monument of that family at once. It shows a dash when some are ticked and some are not; clicking a dash ticks them all.
- The search box matches a monument’s name, its prefab path and its family. While you type, every family
with a match opens by itself. ALL and NONE apply to what the search shows, so searching
airfieldand pressing NONE leaves out just the airfield. The total at the top, and on the section’s heading while it is closed, reads k of N monuments included. - Two monuments that share a name in Rust are told apart by the end of their prefab file name: the two harbors read Harbor 1 and Harbor 2, and the two smaller fishing villages Fishing Village B and Fishing Village C. The assistant’s monument list uses the same names, and a recipe that says Harbor still means both harbors.
- A monument marked x2 or x3 is one Rust’s pool carries more than once, so its family draws it more often. A family marked needs 4500 m (or another size) is one Rust skips on a map this small.
- A family whose component is unchecked in the checklist below is shown dimmed and marked not generated; hover it for why. On a map that already has monuments those components start unchecked, so the map keeps its own.
How many of each family. On each family’s line, the number between - and + is how many of that family the map asks for, with Rust’s own count for this map size beside it (Rust: 3). - and + ask for one fewer or one more, and DEFAULT, which shows only while you have asked for a different number, puts the family back on Rust’s own count.
- Rust’s own count is what a Rust server places on a map this size: the family’s target for the size, or one of each of its ticked monuments for a family that places each at most once (Harbors, Main Monuments, Tiny Monuments and the like). Unticking monuments lowers it for a one-of-each family.
- Fewer caps the family at your number, and 0 leaves the whole family out.
- More draws extra copies from the family’s own ticked monuments, in the proportions Rust already uses, so asking for six Harbors on a map whose Rust count is two repeats both harbors. Every one of Rust’s placement rules still applies to every copy: how far apart two of the same family must stand, the ground each needs, the coast, the biome. A family that cannot fit what you ask places fewer, and a crowded family on a small map can end up with its usual number or less.
- The offshore oil rigs have no count: Rust places them on its own ring around the map.
- Combined with the ticks: the count applies to the monuments you left ticked, so ticking only Launch Site and asking Main Monuments for three asks for three Launch Sites, which Rust keeps well apart. Combined with pins: an island’s share of a family is its share of the count you asked for.
The GENERATE confirm says how many families you changed (Monument counts changed: 2 families.). Creator’s server-readiness check warns, rather than refusing, when a count is more than the family could fit on the map at all, when a family is not placed at this map size, and when every monument of a family is unticked.
Leaving a monument out works the way a Rust server’s own blacklist of that one prefab does: the family draws
from the monuments that are left, every other family is untouched, and a family with nothing left places
nothing. Two combinations change how the map plays, and Creator’s server-readiness check (the assistant’s
validate tool, or the -validate launch flag) warns about them rather than refusing: leaving out every tunnel
entrance leaves the map with no train tunnel network, and leaving out both Outpost and Bandit Camp leaves it
with no safe zone.
The names are the game’s own once Creator has built those monuments at least once on your content snapshot; before that, a few read as a tidied-up file name. The list appears once your Rust content has loaded.
To place a monument on a chosen island, pin it in ISLANDS AND ROADS, above. The list only says what may be placed.
Custom monuments: your own packs, placed by the generation
Section titled “Custom monuments: your own packs, placed by the generation”Below the families sits one more, Custom. It places a pack you saved in the prefab workspace (any pack in your custom prefab library) as a monument of its own. To add one:
- Choose the pack under Pack and press ADD PACK. Pressing it again for the same pack asks for one more.
- Set its rules (below). The - and + beside its name set how many; REMOVE PACK takes it out.
- Generate in Creator Mode. Custom monuments are Creator Mode only: a Standard Mode run never places one.
Each custom monument has six rules:
| Rule | What it does |
|---|---|
| How many | How many of this pack the map asks for (0 to 20). A map with no room for all of them places fewer, and the section’s last line says how many were placed. |
| In Arid, In Temperate, In Tundra, In Arctic, In Jungle | The biomes it may stand in, read at its center. All five ticked means any biome. |
| Min distance (m) | The least distance from its edge to any other monument, Rust’s own or custom (200 m by default). |
| Steepest ground (deg) | The steepest ground it may be placed on, measured under its whole footprint before it is placed (20 degrees by default). |
| Land only | Keeps it on dry land, clear of the sea, lakes, rivers and swamps (on by default). |
| Near a road | Places it beside a road (on by default). Untick it to place it where a monument goes instead. |
It also always stays inside the map with its blended edge, clear of every bridge the run builds, and clear of every rail line: its blended edge stays at least 20 m from any track and 72 m from the end of one (where a tunnel entrance can stand). Its blended edge never reaches a river either, even with Land only off.
It never stands on a small islet: the landmass under it must cover at least 250,000 m2 (a 500 m square), or at least half the size of the largest landmass on the map. The second half is what lets a small map’s one island take packs (Rust’s own island on a 1000 m map is under 0.1 km2) and what keeps every island of your own archipelago in play when they are all about the same size. A true islet stays out: on Rust’s own maps the second-largest landmass is under a twentieth of the largest. This applies beside a road too, and to the fallback spot.
Every spot it tries is on dry land. Each attempt to place a custom monument starts from a spot on dry ground: above the sea, off lakes, rivers and swamps, and far enough in from the map edge for its blended edge to fit. So a map that is mostly sea still spends every attempt on land, and a pack that is not placed was refused by its rules (slope, other monuments, roads, rails, islets), not by open water. When spots were refused for standing on an islet, the log names the islet’s area beside both floors, for example “landmass 62,263 m2 under the 250,000 m2 islet floor and under half the largest landmass (534,199 of 1,068,398 m2)”.
On a small map there may be no room. Rust’s own island covers only a small share of a 1000 m map, and a pack needs its footprint plus the 24 m ring on dry ground, clear of the edge and of other monuments, so a large pack can still find no room there. When a pack places none, the section’s last line says so, and the log names the largest clear dry rectangle the map offers beside what the pack needs, for example “needs about 138 x 118 m of clear dry ground; this map’s largest is 90 x 60 m” (measured on a 10 m grid). For large packs, generate 2000 m or more.
Where it goes. A custom monument that is not near a road is placed right after Rust’s own monument families and before the roads, exactly where a vanilla monument would be: the roads, the rocks, the cliffs and the rest of the dressing that come after it keep clear of it as they keep clear of Rust’s monuments. One marked Near a road is placed after the roads are laid, beside one of them, the way Rust places its own roadside monuments (gas stations, supermarkets): facing the road with its front edge 16 m from the road’s center. The road passes it; no road is moved for it, no road runs through it, and no road ends at it. Joining a custom monument to the road network is not part of the alpha. If there is no spot beside a road that meets its rules (no road on the map, or none with room beside it), it is still placed: as an ordinary monument, at least 15 m from every road and 40 m from every road’s end, and the note under the pack in the panel says no roadside spot; placed clear of roads.
Its ground. The pack’s own terrain (the ground it was saved with) is set into the map at the height that makes its average cut equal its average fill, and it blends into the land around it over a 24 m ring, the way Rust blends its own monuments, so it does not leave a cliff-edged plateau. A pack with no terrain of its own gets a flat pad under it. Its ground textures blend over the same ring, and its topology (marked as a monument) and any holes it carries are written inside its footprint. Inside the footprint, natural ground (grass, sand, snow) is the map’s own, so the pack fits every biome it lands in; paths, pads, gravel and rock stay as you painted them. To keep a painted lawn or beach, place the pack by hand.
What a plain server shows. Every ordinary prefab in the pack appears on any server, like any placed prefab, and the pack’s name is written on the in-game map at its center, which every player sees. What a pack carries beyond ordinary prefabs (building blocks, wiring, loot, NPC spawners and volumes) needs the Creator server extension, as it does for any custom prefab.
The recipe remembers the pack. The map’s recipe records each custom monument by the pack’s name and a fingerprint of the pack’s files, so generating again places the same pack. If you have changed the pack since, the next run places it as it is now and says so, in the log and under the pack in the panel. A pack that is no longer in your library is left out and named.
TROPICAL: the Tropical biome
Section titled “TROPICAL: the Tropical biome”The TROPICAL section gives a run the Deep Sea’s tropical look. Its two checkboxes, Semi-Tropical and Fully Tropical, are both off by default and only one can be on at a time; with both off the run writes nothing tropical and Arid stays desert.
- Semi-Tropical makes the islands you tick, and if you choose it the Arid band Rust’s own generation places, Tropical as the run finishes: their ground is saved as Arid under a Tropical layer, their beaches use Sand rather than the Snow slot, and they are dressed with the Deep Sea islands’ own palms, figs, bushes and rocks.
- Fully Tropical puts the whole map on the tropical look and dresses the land where Arid is the main biome.
Prop density is a percentage of what the Deep Sea islands carry (100 % by default), and a run adds at most 20,000 props. The generation undo takes the Tropical ground and the props back with the rest of the run. What each server shows, and the palettes themselves, are on Tropical biome.
DEEP SEA ISLANDS: the Deep Sea’s islands in your sea
Section titled “DEEP SEA ISLANDS: the Deep Sea’s islands in your sea”Creator Mode’s last section lays out the four tropical islands of Rust’s Deep Sea (Horseshoe, Blob, Round and Line) in the open sea of the map you generate. It is off by default. Tick Lay out Deep Sea islands, choose the Island count (6 by default, the number the game’s own Deep Sea opens) and which of the four islands the layout may use; each is used once before any repeats.
Each island is written into the map exactly as the Island Stamp writes one: its own height, ground textures and topology, with its palms, cliffs and dwellings on top. Because the island is the map’s own ground and art, it works on any server and no Deep Sea close removes it. The layout keeps every island:
- in open water at least 10 m deep, so it never merges into your coast;
- clear of every monument and every bridge;
- inside the map, with its land at least 250 m from the map edge, where Rust needs open sea;
- at least 600 m from the next Deep Sea island, the spacing the game’s own Deep Sea uses.
A map with little open sea may fit fewer islands than you asked for; the section’s last line says how many were placed and why any were not. The islands keep the Arid ground the game gives them, so with the Tropical biome off they show desert sand and rock; turn on Semi-Tropical or Fully Tropical in the section above for the tropical look. The generation undo takes the islands back with the rest of the run.
An assistant, or a recipe you write, can also put an island at an exact spot, written as island@x:z or
island@x:z:yaw, for example 2@1200:-800:45 (meters from the map center, turned 45 degrees). A spot that
breaks one of the rules above is left out, and the run says why.
What Creator Mode keeps
Section titled “What Creator Mode keeps”A Creator run records everything it was asked to do in the map’s recipe, which is saved in the map’s sidecar when you save the map. Opening the map again opens the panel in Creator Mode with the same settings, and the recipe notes the height it ran on, so the run can be repeated on the same content snapshot. Undoing the run puts the previous map and the previous recipe back.
Driving generation from an assistant
Section titled “Driving generation from an assistant”If you have connected Claude Desktop or Claude Code, generation is one of the things you can ask for in words instead of filling in the form. A request becomes a recipe holding the size, the seed and the rest of the settings above, Creator shows you what it plans to do, and nothing runs until you accept it.
A recipe is in Standard Mode or Creator Mode, the same as the panel. Asking for anything only Creator Mode does (your own heightmap, monuments left out, monument counts, pins, bridges) switches the recipe to Creator Mode, and the assistant is told so in the same answer. The confirm card for a Creator Mode generation carries the CREATOR MODE badge and opens with the panel’s own sentence, so the two can never disagree. The details are on the Claude Desktop page.